Log Replay
Playback in Signal Analysis changes the displayed time in analysis results. Log Replay on this page transmits onto the bus; CSV files of analyzed signal values are not used as transmission logs.
Log Replay transmits normal CAN/CAN FD data frames and remote frames recorded in a communication log CSV according to the replay settings. Error records are excluded.
Up to 3 million eligible records can be replayed. If this limit is exceeded, a limit-exceeded message appears, and up to 3 million eligible records are loaded from the start of the file.
Usage Example

By capturing communication logs between ECUs in advance, you can simulate the communication with log replay even when ECU:A is absent.
Basic Operations
- Select Log Replay in Simulation Window
Select Simulation Window from the menu or toolbar.
Select Log Replay for Simulation Mode in Simulation Window to use log replay.
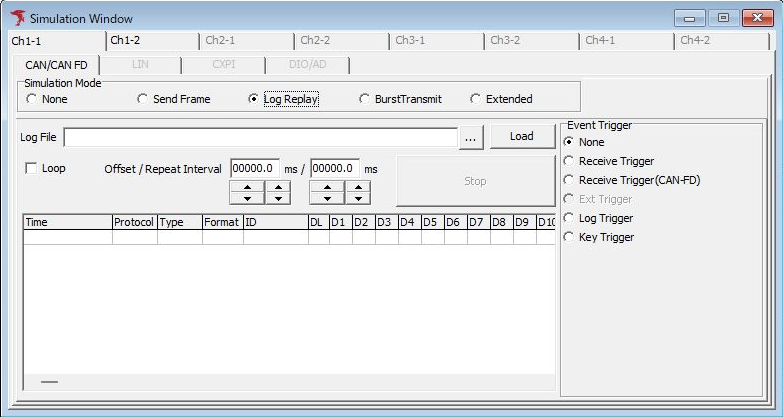
- Load a log file
Click the … button beside Log File and specify the MicroPeckerX log file to load.
Click Load to read the data from the log file.

- Start Monitoring
After configuring log replay, start monitoring to execute log replay.
Start monitoring by selecting Command → Start from the menu bar, clicking the  button on the toolbar, or pressing F5. Frames are then transmitted.

Log Replay Reference
| Item | Description | |
|---|---|---|
| Log File | Displays the path and name of the log file to load. | |
 button | Click to open the file selection dialog and select the log file to load. Note: Selecting a file does not load it. Click Load to read the data. (Note 1) | |
| Load button | Loads the log file. | |
| Loop | Select whether to repeat log replay transmission. If unchecked, transmission enters the waiting state after all log data has been transmitted. | |
| Offset | Specify the time from the start of monitoring to the start of log replay transmission. When an event trigger is configured, this specifies the time from event detection to the start of log replay transmission. (Note 2) | |
| Repeat Interval | Specify the interval between the last frame and transmission of the first frame when looping. (Note 2) | |
| Stop button | Click during log replay transmission to stop it. | |
| Log data display | Displays the contents of the loaded log file. (Note 3) | |
| Event Trigger | None | No event trigger is used. |
| Receive Trigger | Detects reception of a CAN frame with the specified CAN ID as an event. | |
| Receive Trigger(CAN-FD) | Detects reception of a CAN FD frame with the specified CAN ID as an event. | |
| Ext Trigger | Detects a port input as an event. (Note 4) | |
| Log Trigger | Detects the specified monitoring log as an event. | |
| Key Trigger | Detects the specified key input as an event. | |
Note 1: Supported legacy MicroPecker Analyzer CSV files can also be loaded. For the legacy format, normal CAN frames are included and error records are excluded.
Note 2:  buttons can also increase or decrease the value in increments of 1 or 0.1.
Note 3: The contents of the loaded log file are handled as follows:
- Time is relative to the first frame, rather than the original time in the log file.
- Data frames and remote frames are included; error records are ignored.
Note 4: Ext Trigger is under development and is not available.
Event Trigger Settings
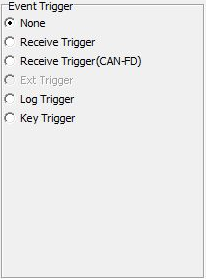
You can configure log replay to start when an event trigger condition is detected.
| Item | Description |
|---|---|
| None | No event trigger is used. |
| Receive Trigger | Detects reception of a CAN frame with the specified CAN ID as an event. |
| Receive Trigger(CAN-FD) | Detects reception of a CAN FD frame with the specified CAN ID as an event. |
| Ext Trigger | Detects a port input as an event. (Note 1) |
| Log Trigger | Detects the specified monitoring log as an event. |
| Key Trigger | Detects the specified key input as an event. |
Note 1: Ext Trigger is under development and is not available.
Receive Trigger / Receive Trigger(CAN-FD) Settings
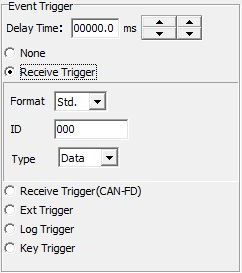
Select Receive Trigger to specify the CAN ID of received frames to detect as events.
For example, you can transmit a frame when a particular CAN ID is received.
Selecting Receive Trigger displays its settings area. Specify the CAN ID of received frames to use as the event trigger.
| Item | Description |
|---|---|
| Format | Select a standard ID (Std) or extended ID (Ext). |
| ID | Specify the CAN ID to use as the trigger. |
| Type | Select a data (Data) or remote (Remote) frame. Available for CAN frames only. |
Log Trigger Settings
Select Log Trigger to specify the log to detect as an event.
Log Trigger supports detailed trigger conditions, such as specific data values and error frames.
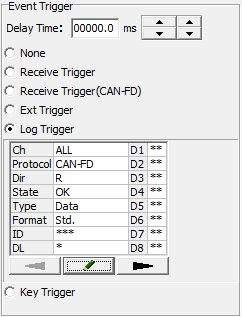
For Log Trigger, click the  button to open the Log Trigger settings dialog. Then click Data Setting to open the Data Setting dialog.
Log Trigger Reference
| Control | Description |
|---|---|
| Settings display | Displays the log information used as the trigger. Double-click to open the Log Trigger settings dialog. |
| button | Click to open the Log Trigger settings dialog. |
Log Trigger Settings Dialog Reference
Specify the log conditions to detect as a trigger.
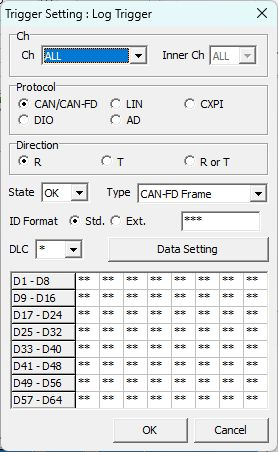
| Item | Description | Settings |
|---|---|---|
| Ch | CH to use as the trigger (MicroPeckerX unit) | Select from the following drop-down options. ALL / 1 / 2 / 3 / 4 |
| InnerCh | CH to use as the trigger (internal MicroPeckerX CH) | Select from the following drop-down options. ALL / 1 / 2 |
| Direction | Specify received/transmitted frames | R: Received frames / T: Transmitted frames / R or T: Both received and transmitted frames |
| State | Specify normal or error frames | Select from the following drop-down options. OK / NG |
| Type | Specify the target frame type | Select from the following drop-down options. [When Status : OK is selected] - CAN-FD Frame - CAN Data Frame - Remote Frame [When Status : NG is selected] - All Error - Bus Error - Error Warning - Error Passive - Bus Off Entry - Bus Off Recovery - Overload - Bus Lock - Arbitration Lost - Stuff Error - Form Error - Ack Error - CRC Error - Recessive Bit Error - Dominant Bit Error - Ack Delimiter Error |
| ID Format | CAN ID selection | Select a standard (Std.) or extended (Ext.) CAN ID. The CAN ID is displayed in Hex. Enter an asterisk (*) to ignore the CAN ID when matching. |
| DLC | CAN data length | Enter an asterisk (*) to ignore DLC when matching. |
| Data Setting button | Open the Data Setting dialog | - |
| Data area | Data area | Displays the data specified in the Data Setting dialog. |
Data Setting Dialog Reference
Click Data Setting in the Log Trigger settings dialog to open the Data Setting dialog.
Specify data conditions for the logs to detect as triggers. Use the tabs to switch between Hex (hexadecimal) and Binary (binary) notation. This dialog configures log matching conditions and is separate from Frame Data - Text Edit, which edits the bytes to transmit.
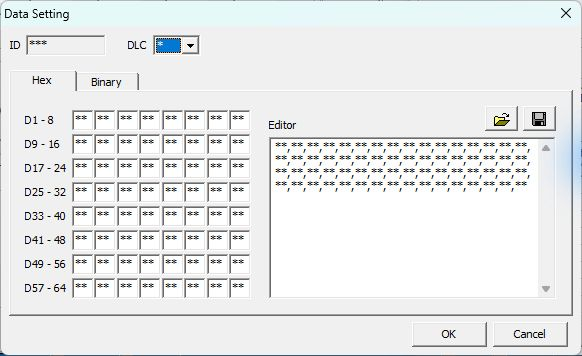
| Item | Description | Details |
|---|---|---|
| ID | CAN ID | The CAN ID cannot be edited in Data Setting. |
| DLC | Data length | The byte entry fields and Editor data area change according to the DLC setting. Enter an asterisk (*) to ignore DLC when matching. |
| Hex / Binary | Display format tabs | Switch the data display between Hex and Binary. |
| Byte entry fields | Data entry area for individual bytes (Note 1) | Each cell holds one byte of data. The upper-left cell is Data1. Enter an asterisk (*) to ignore that data when matching. |
| Editor | Editor area (Note 1) | Enter individual bytes separated by commas. Enter an asterisk (*) to ignore that data when matching. Settings can be saved to and loaded from a CSV file. |
 button | Load a Data Setting settings file | Loads a CSV file saved in Data Setting. |
 button | Save a Data Setting settings file | Saves Data Setting settings to a CSV file. The settings in the Editor are saved. |
Note 1: You can edit data in either the byte entry fields or the Editor. Both displays stay synchronized.
Key Trigger Settings
Select Key Trigger to detect keyboard input as an event.
For example, you can configure frame transmission in response to a key press.
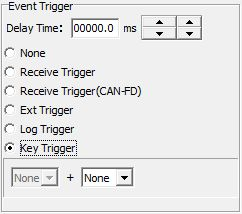
| Item | Description | Details |
|---|---|---|
| Right-hand selection field | Main key setting | Specify the key to use as the trigger. Available keys: 0–9, A–Z, F1–F12, SPACE |
| Left-hand selection field | Modifier key setting | Specify a modifier key to combine with the main key. Available keys: Shift, Ctrl, Alt |