Trigger Function
The trigger function automatically starts and stops logging when predefined conditions are detected during monitoring.
-
Operating condition
- Works only when logging is enabled (
Save Log Fileis checked)
- Works only when logging is enabled (
-
Trigger types
- Frame detection: when a specific CAN frame is received
- Key input: when a user-defined key is pressed
This allows efficient logging only at the required timing.
Configure triggers in the Trigger Window.
Trigger Mode
Trigger operation patterns are as follows.
| Trigger Mode | Condition | Operation |
|---|---|---|
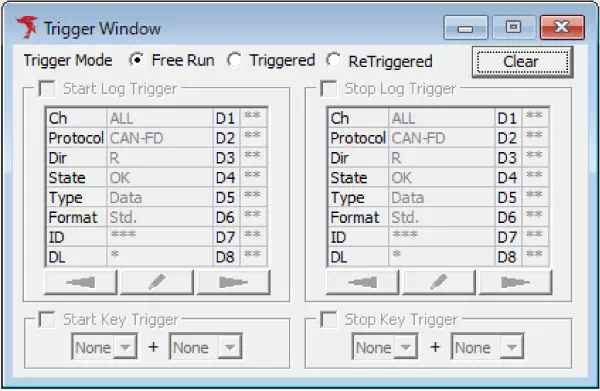
| Free Run | - | Trigger function is not used. Logging starts/stops manually or by normal operation. |
| Triggered | Log Trigger / Key Trigger | Starts or stops logging once when a condition is detected. After stop-trigger detection, monitoring also stops. |
| ReTriggered | Log Trigger / Key Trigger | Repeats start/stop each time a condition is detected. Operates up to 64 times, then stops. |
In ReTriggered mode, both start and stop triggers must be configured, and separate log files are created for each trigger.
Trigger Window Screen Description
| Item | Description |
|---|---|
| Trigger Mode | Select trigger operation mode. - Free Run: trigger disabled - Triggered: operate once when condition is met - ReTriggered: operate repeatedly whenever condition is met |
| Start Log Trigger | Start logging when trigger log data is received. Enable by checking the box. |
| Stop Log Trigger | Stop logging when trigger log data is received. Enable by checking the box. |
| Start Key Trigger | Start logging when the configured key input is detected. Enable by checking the box. |
| Stop Key Trigger | Stop logging when the configured key input is detected. Enable by checking the box. |
| Clear button | Resets (deletes) all configured trigger conditions. |
Log Trigger Setup Procedure
1. Open Trigger Window
Select Trigger Window from the menu or toolbar.
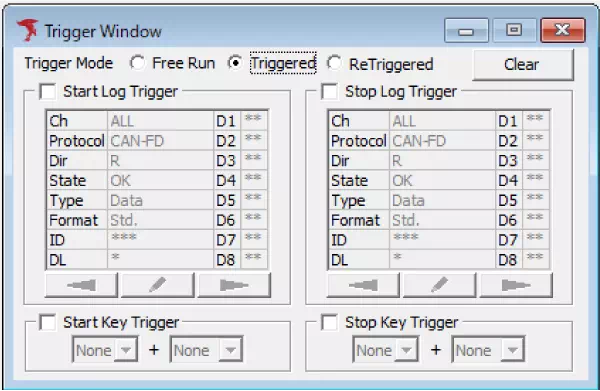
2. Select Trigger Mode
When Triggerd or ReTriggerd is selected, the following fields become editable.
- Start Log Trigger
- Stop Log Trigger
- Start Key Trigger
- Stop Key Trigger
In this example, Triggerd is selected.
3. Configure Start Log Trigger or Stop Log Trigger
Turn on the checkbox for the start/stop trigger you want to use.
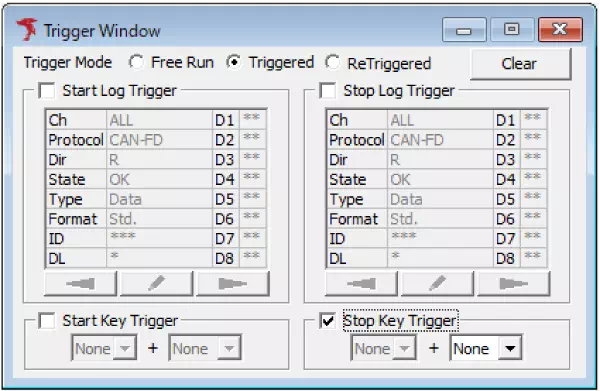
In this example, Stop Log Trigger is enabled to stop logging by Log Trigger.
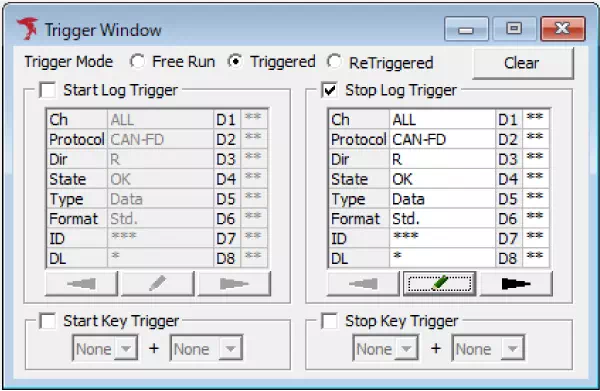
4. Configure Trigger Frame
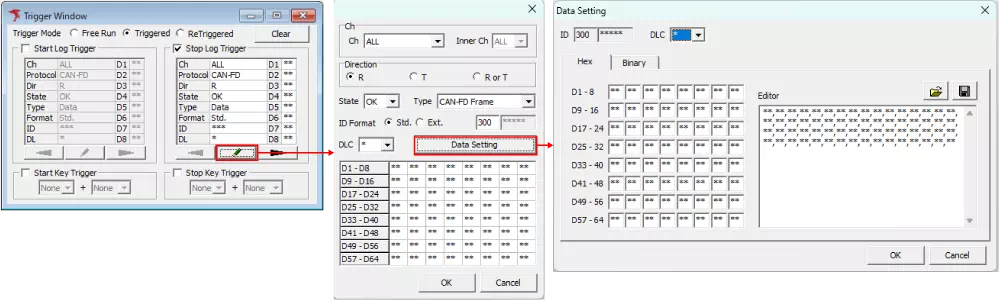
Click the  button (note) to open the Log Trigger Setting dialog and configure the trigger condition frame.
In the Log Trigger Setting dialog, click Data Setting (note) to open the Data Setting dialog and configure message conditions by byte unit.
After setting each dialog, click OK to complete trigger settings.
Note: You can also open each dialog by double-clicking the data display area.
In this example, CAN FD frame ID 300 is set as the trigger condition.
5. Start Monitoring
When monitoring starts, logging start/stop is executed based on trigger condition detection.
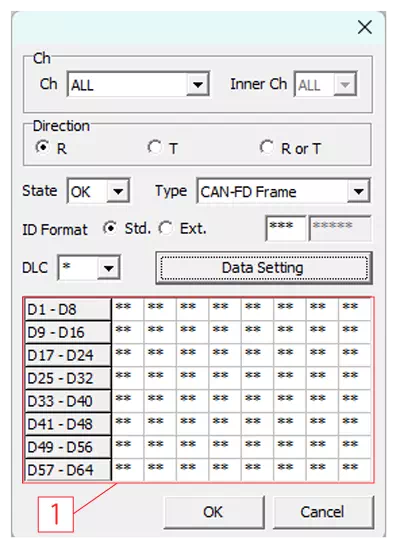
Log Trigger Setting Dialog Description
Configure condition settings for logs targeted for trigger detection.
| Item | Description | Setting Values |
|---|---|---|
| Ch | Channel target for trigger (MicroPeckerX unit) | Select from: ALL / 1 / 2 / 3 / 4 |
| InnerCh | Channel target for trigger (MicroPeckerX internal channel) | Select from: ALL / 1 / 2 |
| Direction | Specify Tx/Rx frame direction | R: receive / T: transmit / R or T: both |
| State | Specify normal or error frame | Select from: OK / NG |
| Type | Specify target frame type | Select from: [When Status = OK] - CAN-FD Frame - CAN Data Frame - Remote Frame [When Status = NG] - All Error - Bus Error - Error Warning - Error Passive - Bus Off Entry - Bus Off Recovery - Overload - Bus Lock - Arbitration Lost - Stuff Error - Form Error - Ack Error - CRC Error - Recessive Bit Error - Dominant Bit Error - Ack Delimiter Error |
| ID Format | Specify CAN ID format | Select Standard (Std.) or Extended (Ext.) format. CAN ID is shown in hex. If * is entered, CAN ID is not evaluated. |
| DLC | CAN data length | If * is entered, DLC is not evaluated. |
| Data Setting button | Open Data Setting dialog | - |
| [1] | Data field | Displays data set in the Data Setting dialog. |
Data Setting Dialog Description
Click Data Setting in the Log Trigger Setting dialog to open the Data Setting dialog.
You can configure data conditions for trigger-target logs. Display can be switched by tabs between Hex (hexadecimal) and Binary.

| Item | Description | Details |
|---|---|---|
| ID | CAN ID | CAN ID cannot be edited in Data Setting. |
| DLC | Data length | Display of data setting areas [2] and [3] changes according to DLC settings. If * is entered, DLC is not evaluated. |
| [1] | Hex/Binary display tab | Switch data display between Hex and Binary. |
| [2] | Per-byte data setting area (note1) | Each cell represents 1 byte. Top-left cell is Data1. If * is entered, data is not evaluated. |
| [3] | Editor area (note1) | Data can be set as comma-separated bytes. If * is entered, data is not evaluated.Settings can be saved/loaded as CSV. |
 button button | Load Data Setting file | Loads a CSV file saved from Data Setting. |
 button button | Save Data Setting file | Saves current Data Setting values as CSV. Target is settings in [3]. |
note1: Data can be edited in either [2] or [3]. Both views are synchronized.
Key Trigger Setup Procedure
1. Open Trigger Window
Select Trigger Window from the menu or toolbar.
2. Select Trigger Mode
When Triggerd or ReTriggerd is selected, the following fields become editable.
- Start Log Trigger
- Stop Log Trigger
- Start Key Trigger
- Stop Key Trigger
In this example, Triggerd is selected.
3. Configure Start Key Trigger or Stop Key Trigger
Turn on the checkbox for the start/stop trigger you want to use.
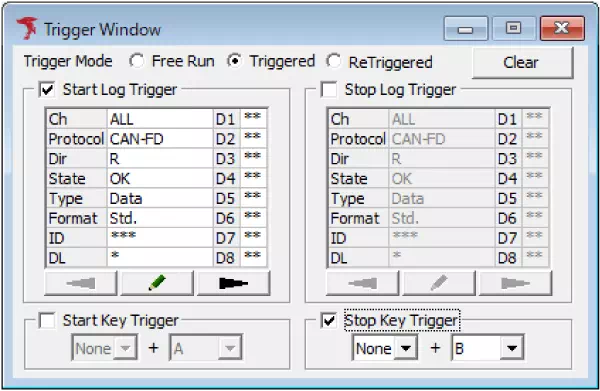
In this example, Stop Key Trigger is enabled to stop logging by Key Trigger.
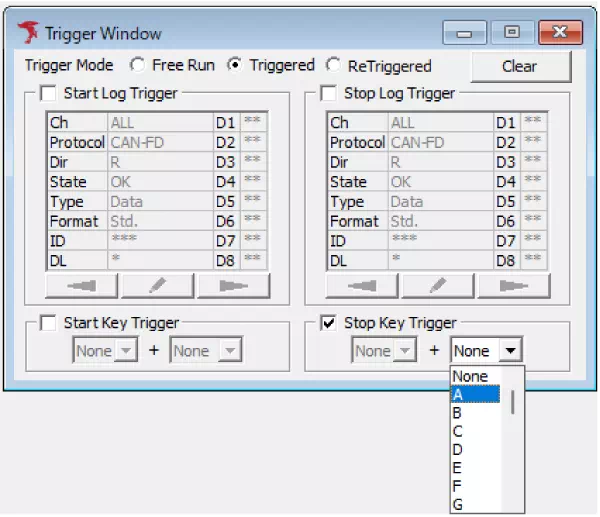
4. Configure Trigger Key
Select the trigger key from the pull-down list. You can also combine it with modifier keys (Alt, Ctrl, Shift).
This completes trigger key settings.
5. Start Monitoring
When monitoring starts, logging start/stop is executed according to the configured key-trigger condition.
Key Trigger Screen Description
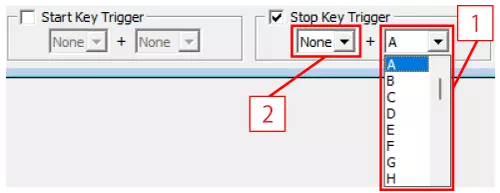
| Item | Description | Details |
|---|---|---|
| [1] | Main key setting | Set the trigger key. Available keys: 0-9, A-Z, F1-F12, SPACE |
| [2] | Sub key setting | Set modifier keys combined with the main key. Available keys: Shift, Ctrl, Alt |
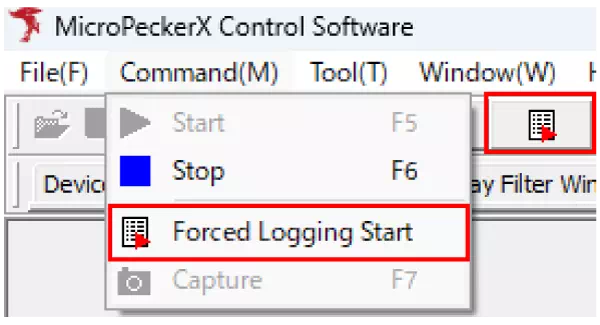
Forced Logging Start
You can forcibly start logging before the start-trigger condition is detected.
Select Command -> Forced Logging Start from the menu bar.
You can also forcibly start logging with the toolbar  button.
Status Bar Display
Trigger waiting/start/stop states are shown on the status bar.
Waiting (before start trigger condition is detected)

Logging Started

Logging Stopped

When start/stop trigger conditions are detected, the status bar shows the trigger information that occurred.