Screen Layout and Choosing Functions
| Purpose | Where to open |
|---|---|
| Prepare signal, frame, and LDF schedule definitions | Signal Catalog on the main toolbar. You do not need to open Signal Window. |
| Check incoming signal values, waveforms, and states | Signal Window. |
| Convert saved logs to signal values for examination | Signal Analysis in Analyze Window. |
| Simulate a LIN master/slave | Simulation Window. |
| Configure conditions to start/stop recording | Trigger Window. |
Windows
The GUI application consists of function-specific windows. Figure 1a shows an example settings arrangement. Click a window name button in the lower row of Figure 1b to display that window. Save and switch arrangements using Layout Settings.
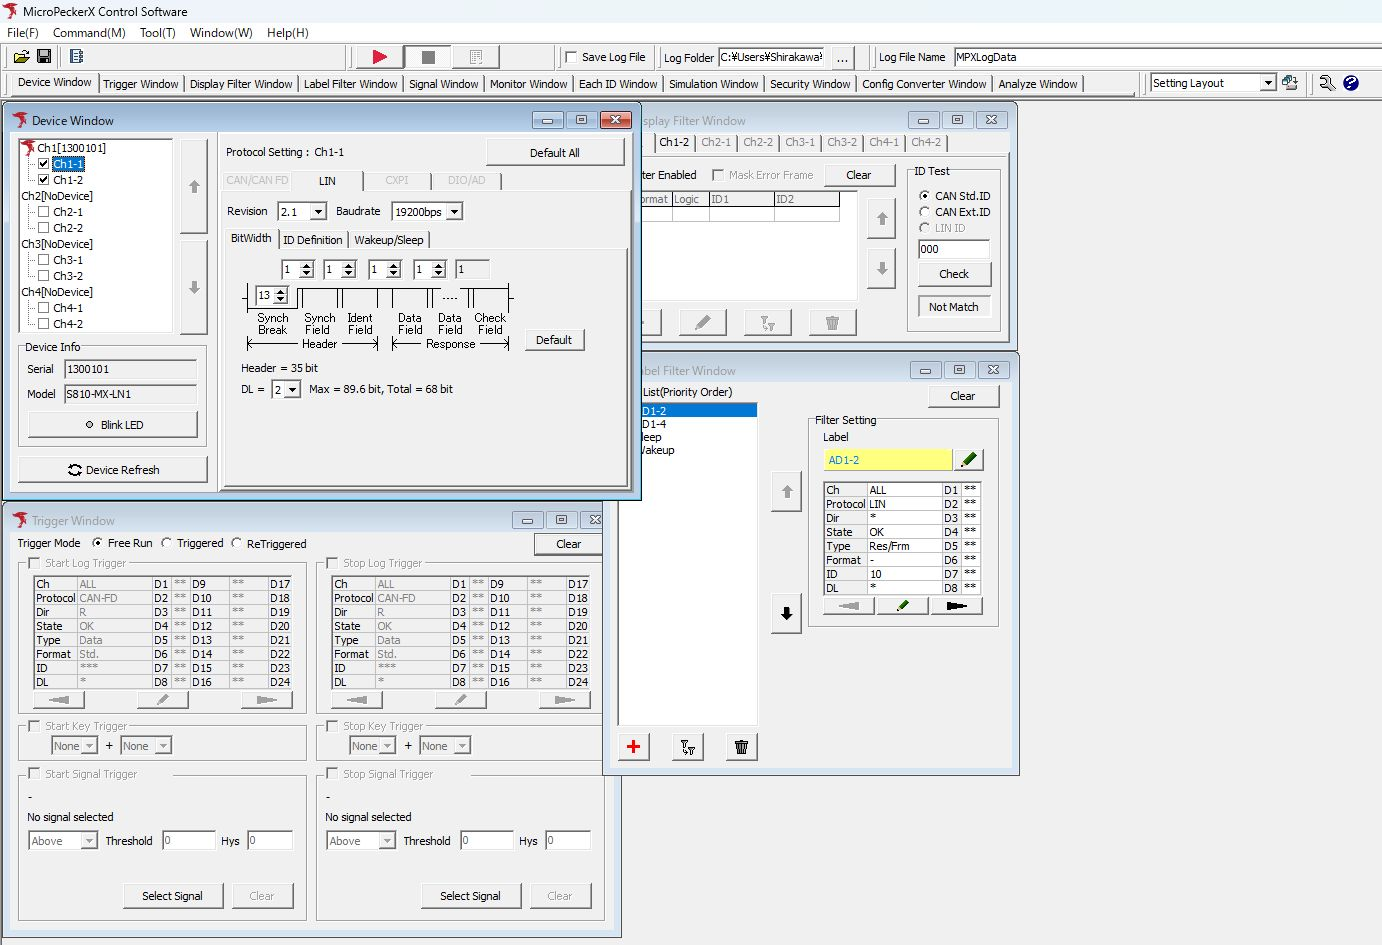
Figure 1a: Example settings arrangement.

Figure 1b: Main toolbar and window switching buttons.
| Window name | Description |
|---|---|
| Device Window | Configures connected MicroPeckerX units. |
| Trigger Window | Configures conditions to start/stop log recording. |
| Display Filter Window | Configures display filters for Monitor Window and Each ID Window. |
| Label Filter Window | Configures frame labels for Monitor Window, Each ID Window, and Analyze Window. |
| Signal Window | Displays monitored signal values, waveforms, and states according to definitions. |
| Monitor Window | Displays monitored frames chronologically. Display items |
| Each ID Window | Displays the latest information for each ID. Display items |
| Simulation Window | Configures simulation that transmits LIN frames from MicroPeckerX. |
| Security Window | Not used with LN1. |
| Config Converter Window | Converts MicroPecker configuration files for MicroPeckerX and applies them. MicroPeckerX Config Converter |
| Analyze Window | Displays captured frame logs and signal analysis results. |
Main Window Menus and Controls
The following sections describe the items in Main Window.

Figure 2: Excerpts showing ① menu bar and ② toolbar at the top of Main Window, and ③ status bar at the bottom.
The top and bottom excerpts were captured at different times. In example ③, Setting and Logging Complete. appear after saving finishes, along with the last activated trigger, [Log] Logging Stop.
| No. | Category | Description |
|---|---|---|
| ① | Menu bar | Groups menus for GUI application settings and functions. |
| ② | Toolbar | Groups operational functions such as starting/stopping monitoring. |
| ③ | Status bar | Displays the GUI application's operating status. |
Menu Bar

Figure 3: Menu bar.
Menu Items
| Item | Description | Additional information | |
|---|---|---|---|
| File | Load Configuration | Opens the Load Config dialog to load a configuration file. | For details, see Loading Settings. |
| Save Configuration | Opens the Save Config dialog to save application settings to a file. | For details, see Saving Settings. | |
| Device | Provides the following submenus: [Refresh] Detects MicroPeckerX units again. [Chx] Displays the serial number of a detected MicroPeckerX unit. Setting All Clear in its submenu clears all settings for that channel. | If you connect or disconnect a MicroPeckerX while the application is running, run Refresh to detect the units again. | |
| Ch Config Import | Opens the Ch Config Import dialog to apply settings from a detected MicroPeckerX or a configuration file to another detected MicroPeckerX. | For details, see Behavior When Loading a Configuration File. | |
| Exit | Exits the application. | ||
| Command | Start | Starts monitoring. | |
| Stop | Stops monitoring. | ||
| Forced Logging Start | When the status is Wait Start Trigger (waiting for a logging start trigger), forces logging to start without waiting for the start trigger. | Unavailable unless the status is Wait Start Trigger (waiting for a logging start trigger). | |
| Tool | Log Editor | Launches MicroPeckerX Log Editor. | When launched from this menu, the initial timestamp and CAN ID display formats follow the settings in the Option dialog. |
| Option | Opens the Option dialog to change option settings. | For details, see Option Settings. | |
| Window | Device Window | Activates Device Window. | A ● mark appears to the left of the name of each active window. |
| Trigger Window | Activates Trigger Window. | ||
| Display Filter Window | Activates Display Filter Window. | ||
| Label Filter Window | Activates Label Filter Window. | ||
| Signal Window | Activates Signal Window. | ||
| Monitor Window | Activates Monitor Window. | ||
| Each ID Window | Activates Each ID Window. | ||
| Simulation Window | Activates Simulation Window. | ||
| Security Window | Activates Security Window. | ||
| Config Converter Window | Activates Config Converter Window. | ||
| Analyze Window | Activates Analyze Window. | ||
| Layout | Provides the following submenus: [Save Current Layout] Opens the Save Current Layout dialog to save the current window layout. [Delete Layout] Opens the Delete Layout dialog to delete saved layouts or reset preset layouts. | For details, see Saving a Window Layout and Deleting a Window Layout. | |
| Help | Help | Displays the MicroPeckerX Web Manual. | |
| License Manager | Launches Sunny License Manager. | ||
| About | Opens the version information for MicroPeckerX Control Software. | ||
Toolbar
The top row of Figure 1b contains the start/stop buttons, Save Log File, Log Folder, and Log File Name. The lower row switches windows and selects/saves layouts.
Start begins monitoring. The recording interval starts according to the mode and conditions in Trigger Window. Wait Start Trigger appears while waiting to start, and Logging while recording. Turn on Save Log File to save communication log CSV files. Monitoring and recording procedure
You can resize and reposition the toolbar using the mouse. Arrange it to suit your monitor size.
The modified layout is saved when the application exits and restored at the next startup.
File

Figure 4: File buttons for loading and saving settings.
| Item | Description | Additional information |
|---|---|---|
 button | Opens Load Config to load a configuration file. | See Loading Settings. |
 button | Opens Save Config to save application settings to a file. | See Saving Settings. |
Command
Use the start/stop buttons in Figure 1b. The start and stop keys are F5 and F6, respectively.
| Item | Description | Additional information |
|---|---|---|
 button | Starts monitoring. | Configure recording start conditions in Trigger Window. |
 button | Stops monitoring. | Esc also stops monitoring. |
 button | When the status is Wait Start Trigger (waiting for a logging start trigger), forces logging to start without waiting for the start trigger. | Disabled unless the status is Wait Start Trigger. |
Layout

Figure 5: Layout selection and save controls.
| Item | Description | Additional information |
|---|---|---|
| Layout list (drop-down menu) | Switches the windows to the selected layout. | Lists all preset and saved layouts. |
 button | Opens Save Current Layout to save the current window arrangement. | See Saving a Window Layout. |
Help

Figure 6: Help buttons for option settings and the manual.
| Item | Description | Additional information |
|---|---|---|
 button | Opens the Option dialog to change option settings. | See Option Settings. |
 button | Displays the MicroPeckerX Web Manual. |
Log
Before starting monitoring, turn on Save Log File and check the destination and file name. After stopping, recording intervals containing data are saved as communication log CSV files.

Figure 7: Log saving controls.
Figure 7 shows Save Log File on, Log File Name set to LN1SpeedTrigger, and No. set to 001. The account portion of the destination path is hidden.
| Item | Description | Additional information |
|---|---|---|
| Save Log File | ON enables automatic communication log CSV saving; OFF disables it. | Separate from starting monitoring or recording. Basic operation and saving procedure |
| Log Folder | Displays the full path to the automatic log save destination selected in Browse For Folder using the  button. | You cannot enter a full path directly in this text box. |
| button | Opens Browse For Folder to select the destination folder for automatically saved log files. | |
| Log File Name | Specifies the name of automatically saved log files. | |
| No. | A sequential number automatically assigned each time a log file is saved (cannot be changed manually). | A subfolder with this number is created in the folder shown in Log Folder, and log files are saved there. |
Click the … button in Log Folder, select a destination folder, and click OK.

Figure 8: Log Folder destination field and … button.
Status Bar

Figure 9: Current status and last trigger indicators.
| Item | Description |
|---|---|
| Status | Displays the current status. For the displayed states and their meanings, see Status Indicators. |
| Message area | Displays processing results such as Logging Complete. when saving finishes. |
| Last Trigger | Displays information about the last trigger. For the displayed information and its meanings, see Trigger Information. |
Depending on the connected device configuration, notifications appear about automatic restoration of saved Signal Sets and synchronization of signal settings loaded from MPXXML. Hover over a notification to read its full text. For actions to take for each notification, see Signal Channel Assignment and Synchronization Notifications.
Status Indicators
| Displayed state | Description | Additional information |
|---|---|---|
| Initializing | The GUI application is initializing. | |
| Setting | The state after GUI application startup, after Device Refresh, or after monitoring and saving have completed normally and the application has returned to settings. | |
| Ready | Monitoring is starting. | |
| Wait for Sync | Waiting for synchronization. | This state occurs when monitoring starts in slave mode. |
| Wait Start Trigger | Waiting for a logging start trigger. | This state occurs when monitoring starts with Triggered or ReTriggered selected as the trigger mode and a start trigger configured. This state also indicates that monitoring is active. |
| Monitoring | Monitoring is active. | This state also indicates that logging is disabled. |
| Logging | Logging is active. | This state also indicates that monitoring is active. |
| Stop Triggerd | Monitoring has stopped due to a logging stop trigger. | This state occurs when a stop trigger condition is detected after logging starts in Triggered mode. |
| Stop Triggerd Max | Monitoring has stopped because the trigger repetition limit was reached. | This state occurs when the number of stop trigger detections reaches the limit (64) after logging starts in ReTriggered mode. |
| Monitor Terminated | Monitoring has been stopped manually. | This state occurs when monitoring (and logging) is stopped manually, for example by clicking the button. |
| Log Generating... | A log file is being generated. | |
| Setting Error | A configuration error occurred. | |
| Device Error | An internal error occurred in the MicroPeckerX unit. | |
| Software Error | An internal error occurred in the GUI application. | |
| Plugin Error | An internal error occurred in a plugin. | |
| Other Error | Another error occurred. |
Trigger Information
| Displayed state | Description | Additional information |
|---|---|---|
| [Log] Logging Start | Logging started because a log-based start trigger condition was detected. | |
| [Log] Logging Stop | Logging stopped because a log-based stop trigger condition was detected. | In ReTriggered mode, this is displayed only when the number of stop trigger detections reaches the limit (64). |
| [Key] Logging Start | Logging started because a keyboard start trigger condition was detected. | |
| [Key] Logging Stop | Logging stopped because a key-input stop trigger condition was detected. |