Trigger Function
By using the trigger function, logging can be started/stopped automatically during monitoring when the preconfigured conditions below are detected.
- When a specific log is detected (Log Trigger)
- When a specific key is pressed (Key Trigger)
This allows logs to be saved efficiently only at the required timing.
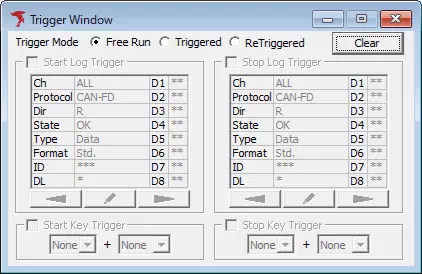
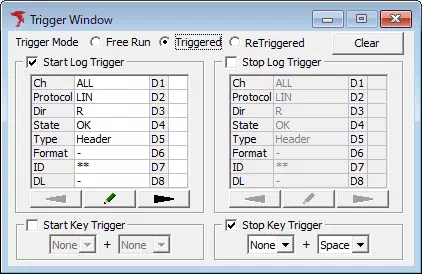
Trigger settings are configured in the "Trigger Window".
Trigger Modes
The available trigger modes and their behavior are as follows.
| Trigger Mode | Behavior |
|---|---|
| Free Run | Disables the trigger function. Logging starts/stops together with monitoring start/stop. |
| Triggered | Enables the trigger function. Logging starts/stops when configured trigger conditions are detected. If a stop trigger is detected even once, monitoring also stops at the same time. |
| ReTriggered | Enables the trigger function. Logging starts/stops when configured trigger conditions are detected. When stop-trigger detection reaches the 64th time, monitoring also stops at the same time. |
In ReTriggered mode, both a start trigger and a stop trigger must be configured. Also, a log file is created each time a start trigger is detected.
Basic Operation
Log Trigger Setup Procedure
1. Open the Trigger Window
Select "Trigger Window" from the menu or toolbar.
2. Enable the trigger function
In "Trigger Mode", select either "Triggerd" or "ReTriggerd" from the radio button options. This enables the trigger function and allows you to configure the following items.
- Start Log Trigger
- Stop Log Trigger
- Start Key Trigger
- Stop Key Trigger

In the example above, "Triggerd" is selected.
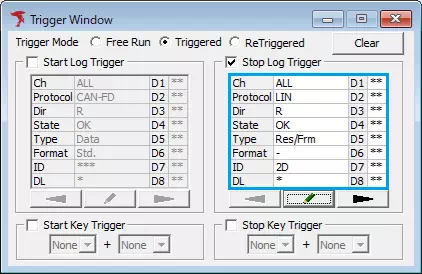
3. Enable Start Log Trigger or Stop Log Trigger
Turn ON the checkbox for "Start Log trigger" or "Stop Log Trigger". This enables Start Log Trigger or Stop Log Trigger.
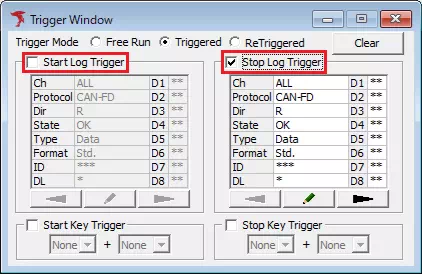
In the example above, the "Stop Log Trigger" checkbox is turned ON to enable Stop Log Trigger.
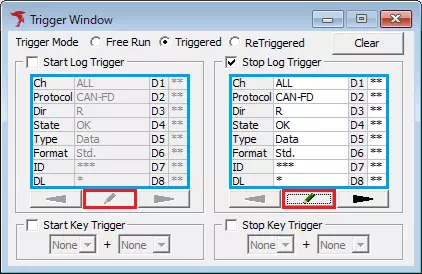
4. Open the Trigger Setting dialog
Click the  button inside the section enabled in step 3, or double-click the trigger condition display area. The Trigger Setting dialog appears.
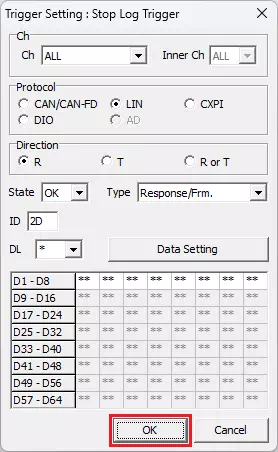
5. Configure log trigger conditions
In the Trigger Setting dialog, set log trigger conditions (protocol, channel, TX/RX direction, etc.).
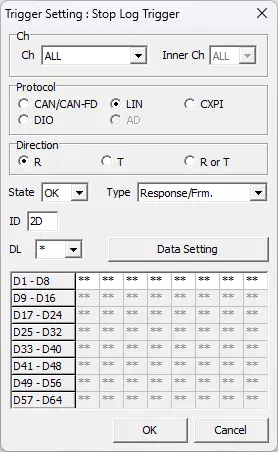
In the example above, reception of a response with ID 2DH is set as the Stop Log Trigger condition.
For details about the "Trigger Setting" dialog, see "Trigger Setting Dialog".
6. Register log trigger conditions
Click the  button in the Trigger Setting dialog.
The configured log trigger condition is registered and displayed in the trigger condition display area of the "Trigger Window".
7. Start monitoring
When monitoring starts, logging starts or stops according to detection of the configured trigger conditions.
Key Trigger Setup Procedure
1. Open the Trigger Window
Select "Trigger Window" from the menu or toolbar.

2. Enable the trigger function
In "Trigger Mode", select either "Triggerd" or "ReTriggerd" from the radio button options. This enables the trigger function and allows you to configure the following items.
- Start Log Trigger
- Stop Log Trigger
- Start Key Trigger
- Stop Key Trigger

In the example above, "Triggerd" is selected.
3. Enable Start Key Trigger or Stop Key Trigger
Turn ON the checkbox for "Start Key trigger" or "Stop Key Trigger". This enables Start Key Trigger or Stop Key Trigger.
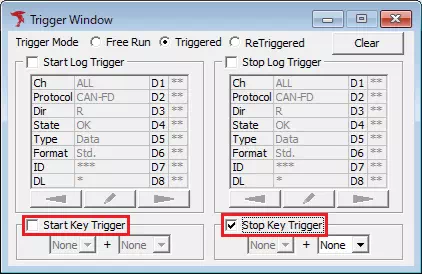
In the example above, the "Stop Key Trigger" checkbox is turned ON to enable Stop Key Trigger.
4. Configure key trigger conditions
In the Main Key and Sub Key pull-down menus, set the key(s) used as key trigger conditions.
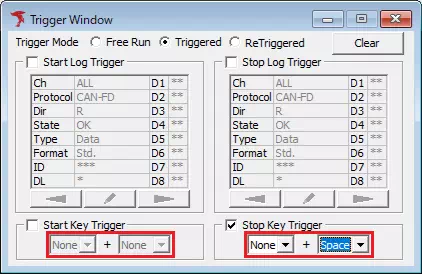
In the example above, the Space key is set as the Stop Key Trigger condition.
For details about key trigger condition settings, see "Key Trigger Screen Description".
7. Start monitoring
When monitoring starts, logging starts or stops according to key input matching the configured trigger conditions.
Trigger Window Screen Description
| Item | Description | Notes |
|---|---|---|
| Trigger Mode | Select the trigger mode. Radio button options are: Free Run, Triggered, ReTriggered | For details, see "Trigger Modes". |
| Start Log Trigger | Sets the start log trigger that starts logging when a configured log is detected. | For details, see "Log Trigger Screen Description". |
| Stop Log Trigger | Sets the stop log trigger that stops logging when a configured log is detected. | For details, see "Log Trigger Screen Description". |
| Start Key Trigger | Sets the start key trigger that starts logging when configured key input is detected. | For details, see "Key Trigger Screen Description". |
| Stop Key Trigger | Sets the stop key trigger that stops logging when configured key input is detected. | For details, see "Key Trigger Screen Description". |
 Button Button | Click to display the dialog below.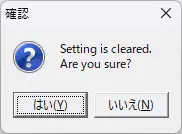 Clicking the "Yes" button deletes all trigger conditions and changes trigger mode to "Free Run". |
Log Trigger Screen Description

| Item | Description | Notes | |
|---|---|---|---|
| Start Log Trigger | Start Log Trigger | Enables/disables Start Log Trigger. Meanings of checkbox ON/OFF are: [ON] Enable Start Log Trigger. [OFF] Disable Start Log Trigger. | Disabled when Trigger Mode is set to "Free Run". |
| Trigger Condition Display Area (Area 1) | Displays Start Log Trigger conditions. | Double-clicking this area opens the "Trigger Setting" dialog (same as clicking ), where Start Log Trigger conditions can be configured. | |
| Button | Click to open the "Trigger Setting" dialog and configure Start Log Trigger conditions. | ||
 Button Button | Click to scroll Start Log Trigger condition display to the previous page. | ||
 Button Button | Click to scroll Start Log Trigger condition display to the next page. | ||
| Stop Log Trigger | Stop Log Trigger | Enables/disables Stop Log Trigger. Meanings of checkbox ON/OFF are: [ON] Enable Stop Log Trigger. [OFF] Disable Stop Log Trigger. | Disabled when Trigger Mode is set to "Free Run". |
| Trigger Condition Display Area (Area 2) | Displays Stop Log Trigger conditions. | Double-clicking this area opens the "Trigger Setting" dialog (same as clicking ), where Stop Log Trigger conditions can be configured. | |
| Button | Click to open the "Trigger Setting" dialog and configure Stop Log Trigger conditions. | ||
| Button | Click to scroll Stop Log Trigger condition display to the previous page. | ||
| Button | Click to scroll Stop Log Trigger condition display to the next page. | ||
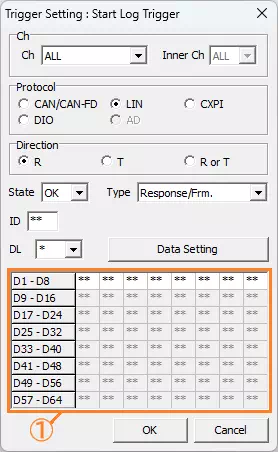
Trigger Setting Dialog
Configure conditions for Start Trigger or Stop Trigger.
| Item | Description | Notes | |
|---|---|---|---|
| Ch | Ch | Sets the log Ch used for log trigger conditions (number assigned per MicroPeckerX unit). Pull-down options are: ALL, 1, 2, 3, 4 When "ALL" is selected, all CH are included in the condition. | |
| InnerCh | Sets the internal Ch used for log trigger conditions (internal Ch number of one MicroPeckerX unit). Pull-down options are: ALL, 1, 2 When "ALL" is selected, all internal Ch are included in the condition. | ||
| Protocol | Sets the protocol of logs used for log trigger conditions. Radio button options are: CAN/CAN-FD, LIN, CXPI, DIO, AD | CXPI and AD cannot be selected. | |
| Direction | Sets the direction of logs used for log trigger conditions. Radio button options are: R, T, R or T | R means receive only, T means transmit only, and R or T means both transmit and receive. | |
| State | Sets the state of logs used for log trigger conditions. Pull-down options are: OK, NG | ||
| Type | Sets the log type used for log trigger conditions. Pull-down options vary depending on selected State: [OK] Header, Response/Frm., Wakeup, Sleep, B-Sleep [NG] All Error, SyncBrk. Long, SyncBrk. Short, Parity Err., ShortMsg Err., Checksum Err., NoRes. Err., Bit Err., Framing Err., SyncField Err., H. Timeout, UART Err. | ||
| ID | Sets the LIN ID of logs used for log trigger conditions in hexadecimal. | This item is shown only when one of the following is selected for Type: Header, Response/Frm. | |
| DL | Sets the data length of logs used for log trigger conditions. Pull-down options are: 1, 2, 3, 4, 5, 6, 7, 8, * | This item is shown only when Response/Frm. is selected for Type. | |
 Button Button | Click to open the "Data Setting" dialog and configure per-byte data of logs used for log trigger conditions. | This item is shown only when Response/Frm. is selected for Type. | |
| Data Display Area (Area 1) | Displays per-byte data of logs used for log trigger conditions configured in the "Data Setting" dialog. | Double-clicking this area opens the "Data Setting" dialog (same as clicking ), where per-byte data can be configured. | |
 Button Button | Click to save configured log trigger conditions and close the dialog. | ||
 Button Button | Click to discard configured log trigger conditions and close the dialog. | ||
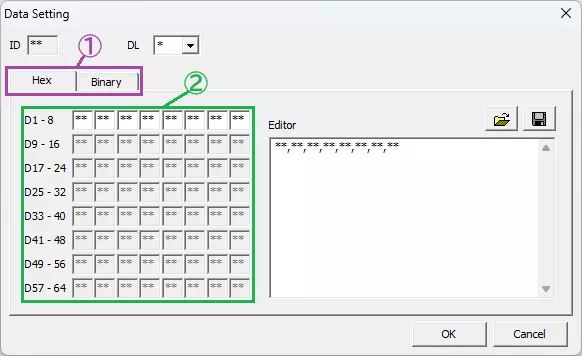
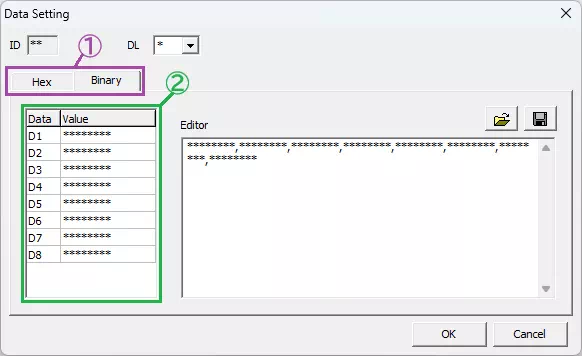
Data Setting Dialog
Configures log data used for log trigger conditions.
Data display format can be switched between Hex (hexadecimal) and Binary via tabs.
| Item | Description | Notes |
|---|---|---|
| ID | Sets the LIN ID of logs used for log trigger conditions in hexadecimal. | ID cannot be changed in this dialog. |
| DL | Sets the data length of logs used for log trigger conditions in hexadecimal. Pull-down options are: 1, 2, 3, 4, 5, 6, 7, 8, * | When data length is changed, the configurable range in the data setting area and editor changes accordingly. The asterisk (*) is equivalent to selecting "8". |
| Display Format Tabs (Area 1) | Switches the data display format by tabs. "Hex" displays hexadecimal and "Binary" displays binary. | |
| Data Setting Area (Area 2) | Sets per-byte data of logs used for log trigger conditions. Enter data values in hexadecimal on the "Hex" tab and in binary on the "Binary" tab. | You can also use an asterisk (*) in data values. Bits specified with an asterisk are not used in search target matching. |
| Editor Area | Sets each byte of data in CSV format. Enter data values in hexadecimal on the "Hex" tab and in binary on the "Binary" tab. | You can also use an asterisk (*) in data values. Bits specified with an asterisk are not used in search target matching. |
 Button Button | Click to open a file dialog and load a CSV file saved with  , then reflect it in the editor display content. , then reflect it in the editor display content. | |
| Button | Click to open a file dialog and save the editor display content to any file in CSV format. | |
 Button Button | Click to save settings and close the dialog. | |
 Button Button | Click to discard settings and close the dialog. |
The data setting area and editor are linked. Changing values in either one automatically updates the other.
Key Trigger Screen Description

| Item | Description | Notes | |
|---|---|---|---|
| Start Key Trigger | Start Key Trigger | Enables/disables Start Key Trigger. Meanings of checkbox ON/OFF are: [ON] Enable Start Key Trigger. [OFF] Disable Start Key Trigger. | Disabled when Trigger Mode is set to "Free Run". |
| Main Key (Area 1) | Sets the key used as Start Key Trigger condition. Pull-down options are: None, A, B, ..., Z, 0, 1, ..., 9, F1, F2, ..., F12, SPACE | If "None" is set as the main key, Start Key Trigger is disabled. | |
| Sub Key (Area 2) | Sets a sub key combined with the main key for Start Key Trigger condition. Pull-down options are: None, Alt, Ctrl, Shift Set "None" when not using a sub key. | You cannot set a Start Key Trigger condition with sub key only. | |
| Stop Key Trigger | Stop Key Trigger | Enables/disables Stop Key Trigger. Meanings of checkbox ON/OFF are: [ON] Enable Stop Key Trigger. [OFF] Disable Stop Key Trigger. | Disabled when Trigger Mode is set to "Free Run". |
| Main Key (Area 3) | Sets the key used as Stop Key Trigger condition. Pull-down options are: None, A, B, ..., Z, 0, 1, ..., 9, F1, F2, ..., F12, SPACE | If "None" is set as the main key, Stop Key Trigger is disabled. | |
| Sub Key (Area 4) | Sets a sub key combined with the main key for Stop Key Trigger condition. Pull-down options are: None, Alt, Ctrl, Shift Set "None" when not using a sub key. | You cannot set a Stop Key Trigger condition with sub key only. | |
Forced Logging Start
When Start Trigger is enabled, performing either of the following operations forces logging to start before Start Trigger is detected.
- Select "Command" - "Forced Logging Start" from the menu bar.
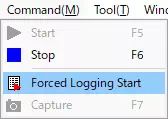
- Click the
 button on the toolbar.