Save/Load Settings
You can save various GUI application settings to a file and load settings from a saved file.
Procedure to Save Settings
You can save GUI application settings to a file.
- Open Save Config dialog
Perform one of the following operations.Save Configdialog appears.
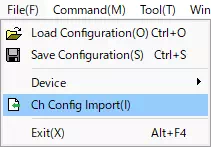
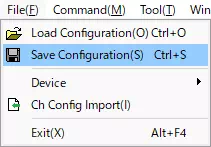
- Select
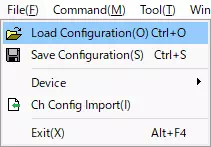
File-Save Configurationfrom menu bar.
- Click
 on toolbar.
 - Press
Ctrl+S.
- Specify destination file
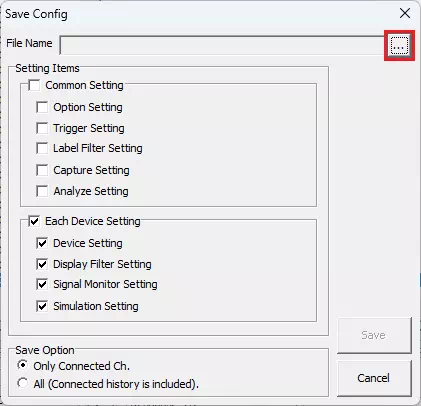
Click in Save Config dialog. File dialog opens. Specify save destination and file name.
If an existing file name is specified in step 2, confirmation dialog below appears.
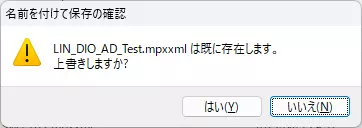
Click Yes to overwrite the existing file.
- Select setting items to save
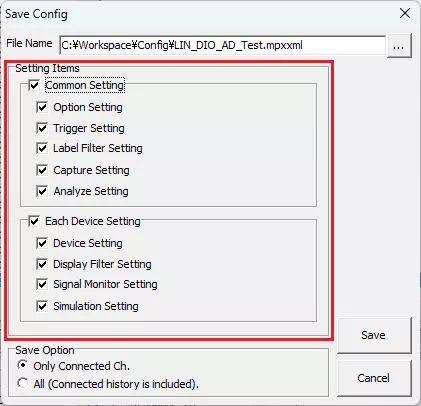
InSetting Itemsof Save Config dialog, set whether each setting item is included using checkboxes.ONincludes,OFFexcludes.
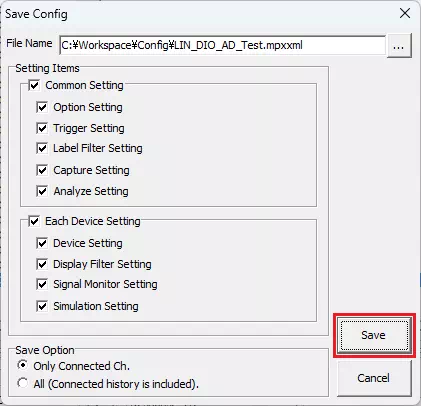
- Execute save
Click in Save Config dialog.
Settings selected in step 3 are saved to the file specified in step 2.
Save Config Dialog Description
In Save Config dialog, settings of each window and Option dialog can be saved to a configuration file.
| Item | Description | Notes | |
|---|---|---|---|
| File Name | Displays full path of configuration file specified from file dialog via button. | Direct input in this text box is not supported. | |
| button | Opens file dialog to specify destination and file name. | ||
| Setting Items | Common Setting | Sets whether common settings for all channels are included in save target.ON: include item.OFF: exclude item. | Changing this checkbox also changes the following 5 items:Option Setting, Trigger Setting, Label Filter Setting, Capture Setting, Analyze Setting |
| Option Setting | Sets whether Option dialog settings are included in save target.ON: include item.OFF: exclude item. | ||
| Trigger Setting | Sets whether Trigger Window settings are included in save target.ON: include item.OFF: exclude item. | ||
| Label Filter Setting | Sets whether Label Filter Window settings are included in save target.ON: include item.OFF: exclude item. | ||
| Capture Setting | Sets whether Capture Window settings are included in save target.ON: include item.OFF: exclude item. | This function is under development and unavailable. | |
| Analyze Setting | Sets whether Analyze Window settings are included in save target.ON: include item.OFF: exclude item. | ||
| Each Device Setting | Sets whether per-channel settings are included in save target.ON: include item.OFF: exclude item. | Changing this checkbox also changes the following 4 items:Device Setting, Display Filter Setting, Signal Monitor Setting, Simulation Setting | |
| Device Setting | Sets whether Device Window settings are included in save target.ON: include item.OFF: exclude item. | ||
| Display Filter Setting | Sets whether Display Filter Window settings are included in save target.ON: include item.OFF: exclude item. | ||
| Signal Monitor Setting | Sets whether Signal Monitor Window settings are included in save target.ON: include item.OFF: exclude item. | This function is under development and unavailable. | |
| Simulation Setting | Sets whether Simulation Window settings are included in save target.ON: include item.OFF: exclude item. | ||
| Save Option | Sets save scope for per-channel settings.Only Connected Ch.: saves only channels recognized at that moment.All (Connected history is included).: saves currently recognized channels plus channels recognized in the past. | ||
| button | Saves settings to file specified in File Name based on Setting Items and Save Option. | ||
 button button | Closes Save Config dialog without saving settings. | ||
Procedure to Load Settings
You can load a configuration file saved by Procedure to Save Settings and apply settings.
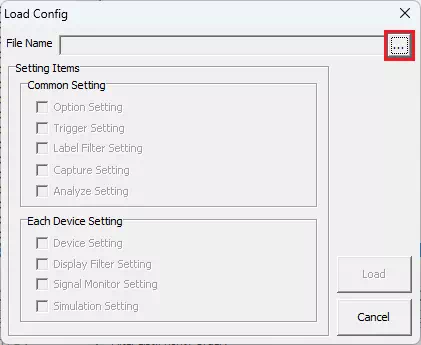
- Open Load Config dialog
Perform one of the following operations.Load Configdialog appears.
- Select
File-Load Configurationfrom menu bar.
- Click
 on toolbar.
 - Press
Ctrl+O.
- Specify configuration file to load
Click in Load Config dialog. File dialog opens. Specify file to load.
- Select setting items to apply
InSetting Itemsof Load Config dialog, set whether each setting item is applied using checkboxes.ONincludes,OFFexcludes.
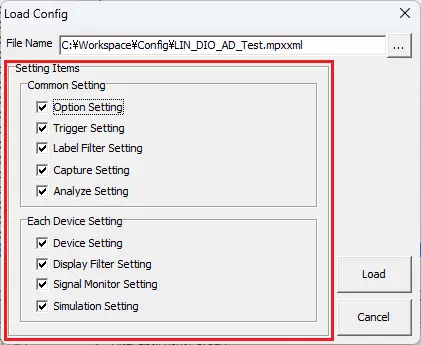
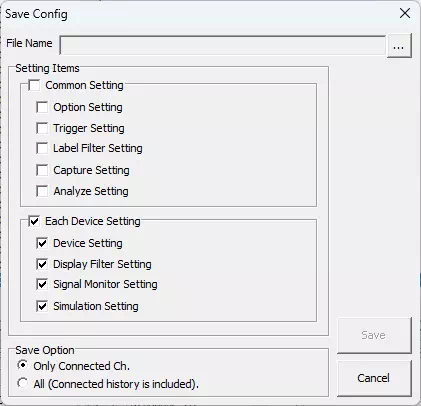
For setting items not saved in the file selected in step 2, checkboxes are disabled.
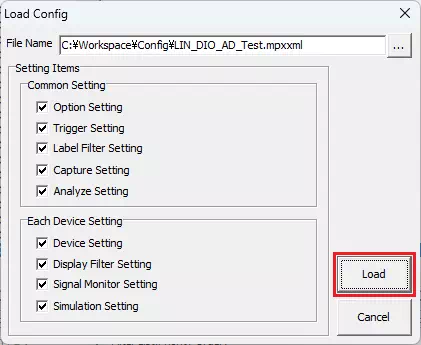
- Execute load
Click in Load Config dialog.
Items selected in step 3 are applied.
Behavior When Loading Configuration Files
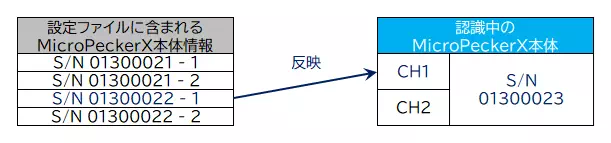
When the configuration file contains information for currently recognized MicroPeckerX units
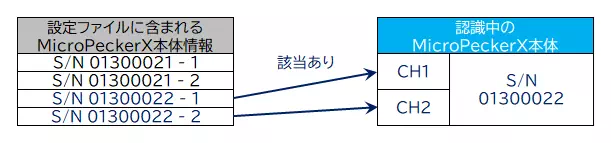
Settings matching serial numbers of currently recognized MicroPeckerX units are applied.
Items unchecked in Setting Items of Load Config dialog keep current settings and are not overwritten by loaded file.
When the configuration file does not contain information for currently recognized MicroPeckerX units
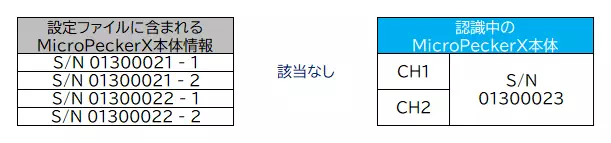
The dialog below is shown.
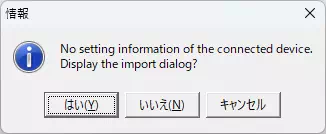
In this case, by following steps below, you can select desired settings from loaded file and apply them to currently recognized MicroPeckerX units.
1. Open Ch Config Import dialog
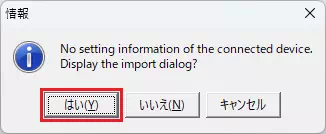
Click Yes in dialog below. Ch Config Import dialog appears.
If button other than Yes is clicked in step 1:
No: onlyCommon Settingfrom loaded file is applied, and currently recognized MicroPeckerX per-channel settings are reset to default.Cancel: returns to Load Config dialog.
2. Select source settings
In Data List of Ch Config Import dialog, select settings from loaded file to apply.
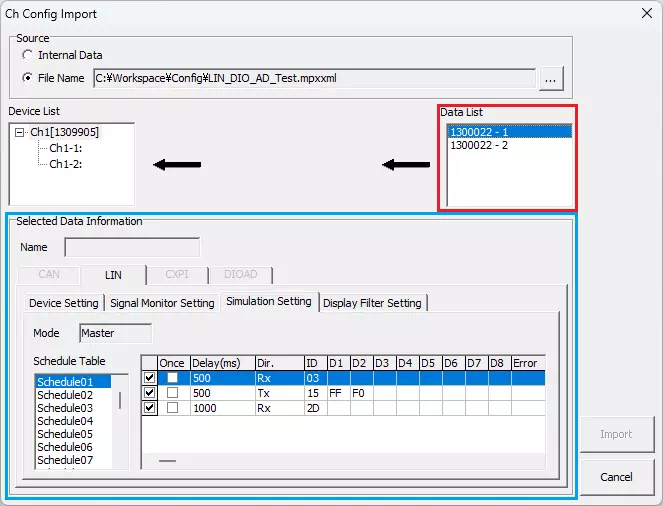
Summary of selected settings (per-channel settings only) can be checked in Selected Data Information.
3. Select destination MicroPeckerX unit
In Device List of Ch Config Import dialog, select channel of currently recognized MicroPeckerX unit to apply selected settings from step 2.
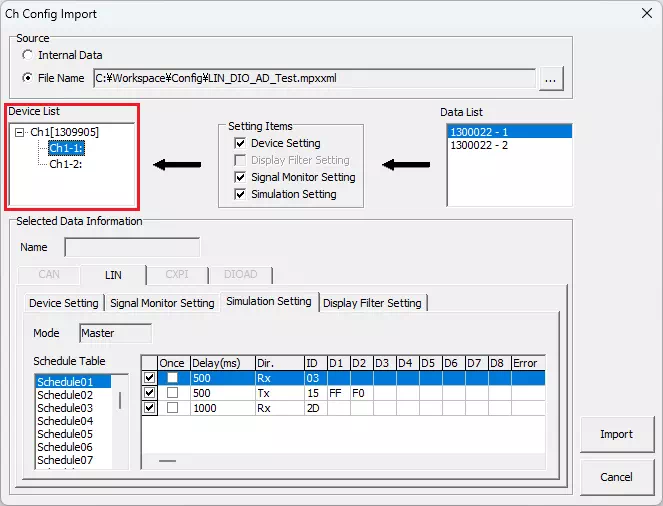
4. Select setting items to apply
In Setting Items of Ch Config Import dialog, set whether each per-channel setting (Device Setting, Display Filter Setting, Signal Monitor Setting, Simulation Setting) is applied. ON includes, OFF excludes.
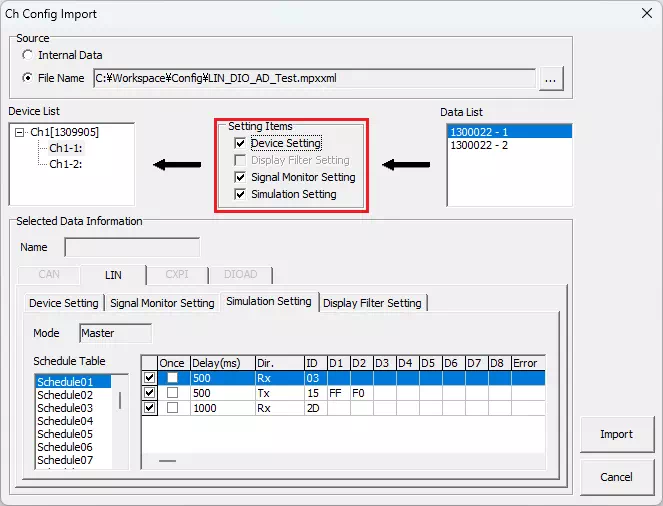
If either condition below is true, display differs from Setting Items:
- Protocol differs between settings selected in step 2 and internal channel selected in step 3 (for example, LIN settings selected in step 2, DIO/AD internal channel selected in step 3). In this case,
Different Device Typeis shown. - Serial number of settings selected in step 2 is same as serial number selected in step 3. In this case,
Same Deviceis shown.
5. Apply settings to MicroPeckerX unit
Click  in Ch Config Import dialog.
Settings selected in step 2 are applied to channel selected in step 3.
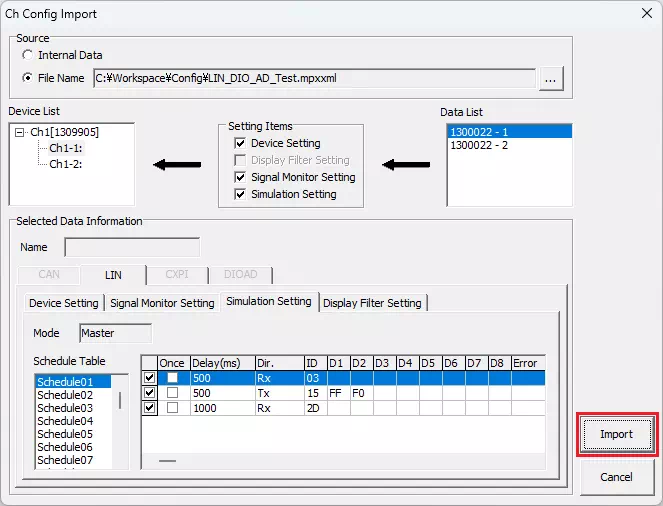
In Ch Config Import dialog, settings are applied per internal channel of MicroPeckerX unit.
Load Config Dialog Description
In Load Config dialog, settings of each window and Option dialog can be loaded from a configuration file.
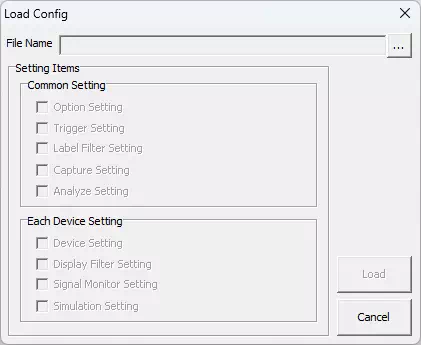
| Item | Description | Notes | |
|---|---|---|---|
| File Name | Displays full path of configuration file specified from file dialog via button. | Direct input in this text box is not supported. | |
| button | Opens file dialog to specify configuration file to load. | ||
| Setting Items | Common Setting | Sets whether common settings for all channels are included in load target.ON: include item.OFF: exclude item. | Changing this checkbox also changes the following 5 items:Option Setting, Trigger Setting, Label Filter Setting, Capture Setting, Analyze Setting |
| Option Setting | Sets whether Option dialog settings are included in load target.ON: include item.OFF: exclude item. | ||
| Trigger Setting | Sets whether Trigger Window settings are included in load target.ON: include item.OFF: exclude item. | ||
| Label Filter Setting | Sets whether Label Filter Window settings are included in load target.ON: include item.OFF: exclude item. | ||
| Capture Setting | Sets whether Capture Window settings are included in load target.ON: include item.OFF: exclude item. | This function is under development and unavailable. | |
| Analyze Setting | Sets whether Analyze Window settings are included in load target.ON: include item.OFF: exclude item. | ||
| Each Device Setting | Sets whether per-channel settings are included in load target.ON: include item.OFF: exclude item. | Changing this checkbox also changes the following 4 items:Device Setting, Display Filter Setting, Signal Monitor Setting, Simulation Setting | |
| Device Setting | Sets whether Device Window settings are included in load target.ON: include item.OFF: exclude item. | ||
| Display Filter Setting | Sets whether Display Filter Window settings are included in load target.ON: include item.OFF: exclude item. | ||
| Signal Monitor Setting | Sets whether Signal Monitor Window settings are included in load target.ON: include item.OFF: exclude item. | This function is under development and unavailable. | |
| Simulation Setting | Sets whether Simulation Window settings are included in load target.ON: include item.OFF: exclude item. | ||
| button | Loads settings from file specified in File Name based on Setting Items, and applies them to GUI application. | ||
 button button | Closes Load Config dialog without loading settings. | ||
For settings not saved in file specified by File Name, checkboxes in Setting Items become disabled.
Ch Config Import Dialog Description
You can apply per-channel settings from GUI internal data or from a loaded configuration file to currently recognized MicroPeckerX units.

| Item | Description | Notes |
|---|---|---|
| Source | Sets data source used for applying settings. Radio options are:Internal Data: use settings of currently recognized (or previously recognized) MicroPeckerX units.File Name: use settings loaded from configuration file. | Click  to open file dialog and specify configuration file to load. After loading, full path is shown to the left of this button. to open file dialog and specify configuration file to load. After loading, full path is shown to the left of this button.If no file is loaded, File Name cannot be selected. |
| Device List | Shows list of currently recognized MicroPeckerX units and lets you select destination for settings. | Settings are applied per internal channel, so selecting a serial-number row does not allow applying settings. |
| Setting Items | For per-channel settings below, you can select each item to apply individually.Device Setting, Display Filter Setting, Signal Monitor Setting, Simulation SettingON: include item.OFF: exclude item. | Signal Monitor Setting is under development and unavailable.If either condition below is true, display differs from Setting Items:- Protocol differs between Data List selection and Device List channel selection: Different Device Type is shown.- Serial number is same between Data List selection and Device List selection: Same Device is shown. |
| Data List | Shows list of settings from source selected in Source, and lets you select settings to apply to recognized MicroPeckerX units. | When a setting is selected, summary (per-channel settings only) is shown in Selected Data Information. |
| Selected Data Information | Displays protocol and per-channel setting summary for data selected in Data List. | Protocol is shown in upper tabs; tabs for non-applicable protocols are disabled. Per-channel setting display can be switched by clicking each tab. |
| button | Applies per-channel settings selected in Setting Items from data selected in Data List to channel selected in Device List, then closes dialog. | Common settings for all channels are also applied. |
 button button | Closes dialog without applying per-channel settings. | Common settings for all channels are applied. |
Ch Config Import dialog can also be opened from menu bar by selecting File - Ch Config Import.