Signal Window Screen and Display Operations
Overview
Signal Window displays values, waveforms, and states from Current Set. Select “Signal Window” using the window tabs at the top. First prepare signal definitions and channels using the basic operations.
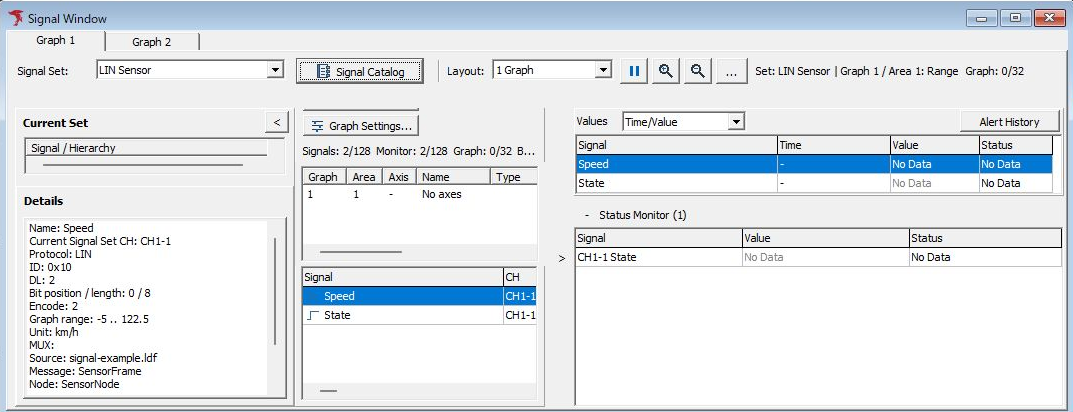
Figure 1. Signal Window with LIN Sensor selected before monitoring.
Figure 1 shows settings for displaying Speed and State from SensorFrame (ID 0x10, DL 2) on CH1-1. Values and State's Status Monitor are on the right. Graph is not used, and Graph Settings in the center shows No axes. No Data and “-” indicate that no value has been acquired; distinguish them from numeric 0.
Screen Layout
| Location / item | Description |
|---|---|
| Graph 1 / Graph 2 | Switch graph tabs. Names can be changed in settings. |
| Signal Set | Shows the current Set. To switch Sets, select the target in Signal Catalog and click Set Current. |
| Signal Catalog | Configure definitions, Sets, membership, channels, and other settings. |
| Layout | Selects the Area arrangement within a tab, such as 1 Graph or 4 Graphs. |
| Current Set | Shows signals in use in a channel → frame → signal hierarchy. Expand/collapse with +/−. |
| Details | Check the selected signal's channel, communication type, ID, data length, bit position, conversion, unit, and other details. |
| Central Graph | Shows waveforms for signals assigned to Areas in the selected tab. |
| Graph Settings... | Opens graph settings. Check Graph, Area, Axis, and other assignments in the list below. Figure 1 shows No axes. To add unassigned signals, see automatic layout. |
| Values | Shows target values and timestamps. The Time/Value view in Figure 1 displays Signal, Time, Value, and Status. Use the selector to switch the column layout. |
| Bar Monitor | Shows numbers as bars when display targets are configured. |
| Status Monitor | Shows the signal's Value and Status. Both columns for CH1-1 State show No Data in Figure 1. |
| Signal list / Display Settings | Check or change Monitor, Graph, assignments, Bar, Status, Alert, and other settings per signal. The central list in Figure 1 shows the Signal and CH columns. |
| Alert History | Opens the history of alert occurrences and recoveries. |
If multiple signals have the same name, check CH, ID, and frame name rather than relying on the name alone. Select the same signal in Current Set, Values, and the signal list, then compare Details. If a narrow display region hides columns or controls, adjust the boundaries or horizontal scrolling.
Changing Display Targets
- Stop monitoring.
- Select the target signal in Display Settings.
- Configure the required Monitor, Graph, Bar, and Status displays. Editable items depend on the signal type.
- To edit details, click “Signal Setting” in Display Settings.
- To change waveform placement, use the Graph assignment field or graph settings.
Monitor indicates inclusion in the value list; Graph indicates waveform display. If Graph is on but the destination is Unassigned, configure an assignment.
Checks During Monitoring
Values update when monitoring starts and response data for the target frame is acquired. Figures 2 and 3 show the same right-hand pane before and after acquisition. The Values selector is set to Time/Value.
In Figure 2, both Speed and State have “-” for Time and No Data for Value and Status. In Status Monitor below, CH1-1 State also has No Data for both Value and Status.
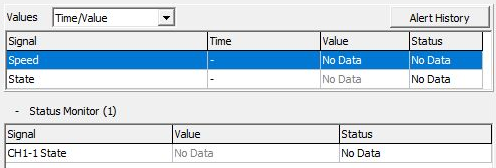
Figure 2. Values and Status Monitor before data acquisition.
In Figure 3, Speed is 10 km/h and State is On; both have Status Received in Values. Both signals have the same Time, +0000005.102581. In Status Monitor below, State has Value On and Status Defined.
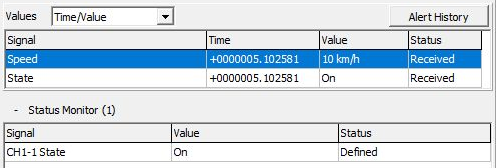
Figure 3. Values and Status Monitor after data acquisition.
Received in Values indicates that signal data has been acquired; Defined in Status Monitor indicates that a state name is defined for the Raw value. In this example, State's Raw value 1 corresponds to On. Do not infer transmission/reception direction from these Status indicators alone; also check Dir in Monitor Window or Each ID Window.
Figure 3 is an actual transmission example: Master Sim. on CH1-1 transmits ID 0x10 with data “1E 01” as Tx every 100 ms, and the data is decoded. Speed's Raw value 30 becomes 10 km/h, and State's Raw value 1 becomes On. Compare the Response row at the same timestamp (Dir T, ID 10, DLC 2, D1 1E, D2 01) in Figures 8 and 9 of the basic operations. These settings differ from the Rx slot obtained immediately after normally applying SensorSchedule from the LDF.
Pausing Graphs Versus Stopping Everything
Pause/Resume on the toolbar pauses/resumes graph display. Do not use it to stop communication monitoring or log recording as a whole. To change definitions or communication conditions, use Stop at the top of the application.
Figures 4 and 5 show a separate capture with the Set set to Default, monitoring SensorFrame on CH1-1 and checking Values while the graph remains paused. Both show the Resume (▶) button, a graph time axis of 0–60 seconds, and the same waveform position up to the rising edge at 20 seconds.
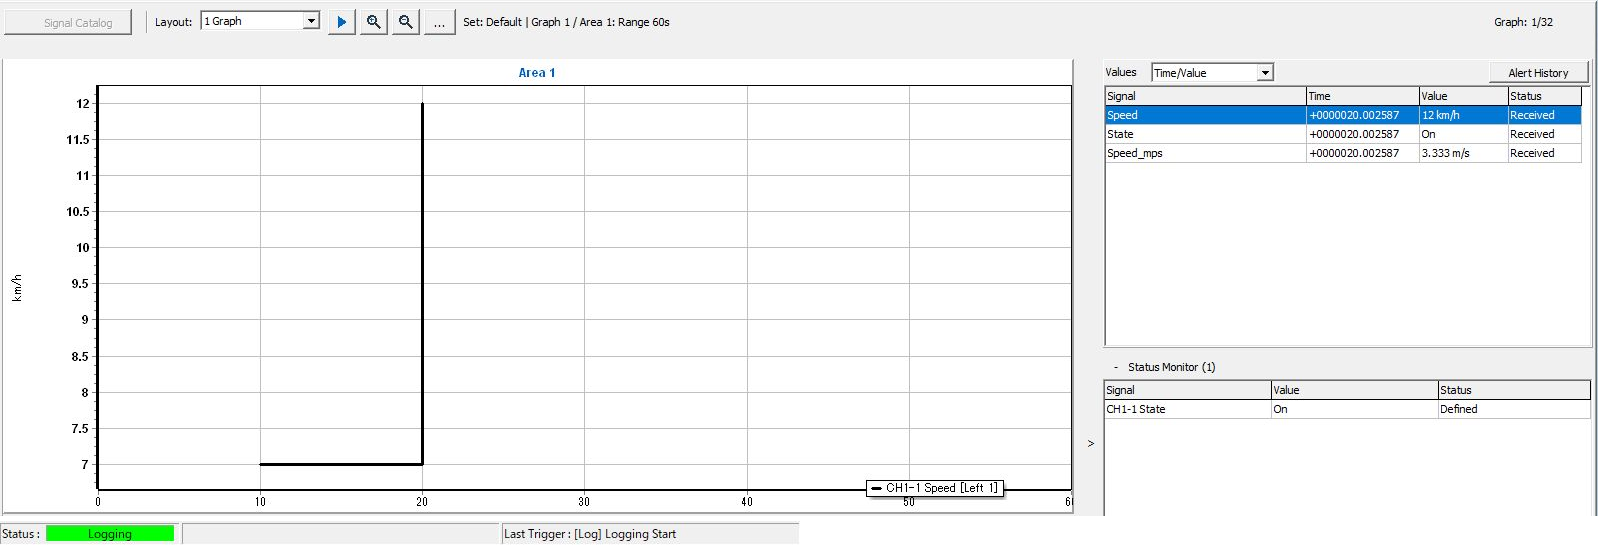
Figure 4. Checking Values while the graph is paused.
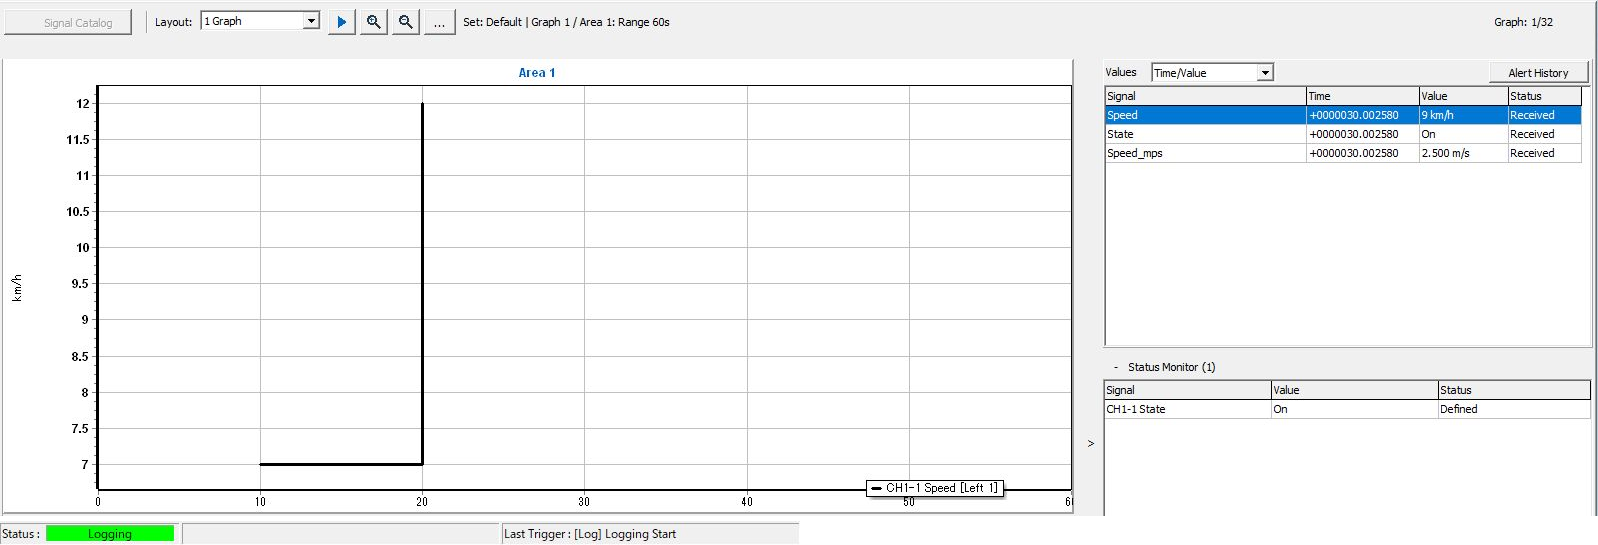
Figure 5. Values timestamps and values update while the graph remains paused.
Speed in Values updates from Time +0000020.002587 at 12 km/h in Figure 4 to +0000030.002580 at 9 km/h in Figure 5. State is On in both. Both screens show Logging: value updates and log recording continue while graph display is paused. Even when a value appears unchanged, compare it at the same Time.
Display Range and Selected Area
Zooming in/out or resetting the time range links the time axes of Areas within the same graph tab. Select the target Area before saving or copying its image.
Adjusting Display Regions
You can expand/collapse Current Set and Display Settings, adjust left/right boundaries, and change region heights. If a region is not visible, check its expand/collapse button, heading, boundary position, and horizontal scrolling. For the overall screen arrangement, also see Layout Settings.
If Nothing Is Displayed or Values Differ
| Symptom | Items to check |
|---|---|
| A signal is missing from Current Set | Check the active Set, the signal's In Set setting/channel assignment, and whether the tree is expanded. |
| A signal cannot be found in the Catalog | Check Catalog search conditions and the Only selected Set filter. |
| No Data or “-” appears | Monitoring started, actual frame reception, Monitor, CH, Protocol, Direction, ID, data length. |
| Unassigned appears | Use the display field and Details to distinguish an unassigned channel from an unassigned graph. |
| Values appear but no waveform | Graph enabled, tab/Area assignment, current layout, time range. |
| Number or sign differs | Endian, bit position, length, Signed, conversion formula, Value Table. |
| State name differs from expected | Raw-to-Logical mapping, target frame, reception direction. |
| Changing the unit does not change the value | Unit is a display name. Conversion requires changing the formula. |
| Only the bar range differs | Check the Bar range and shared graph axis range separately. |
| Only a particular multiplexed signal has no value | Selector value and that signal's multiplexing condition. |
| Settings cannot be edited | Stop monitoring and check whether analysis is running. |
If Header appears on its own in the LIN frame list, that row does not update the signal value. If a value has already been acquired, it stays at its last value. Check the corresponding Response or LIN Frm. when comparing signal values with frame data.
Do not interpret a missing value as zero or normal. First check the source frame, then isolate the cause in the order of definition, channel, and display.
Analyze recorded logs with Signal Analysis. For transmission settings and initial-value editing using signal definitions, see transmission integration operations.