How to Use
Log File Creation Flow
The procedure for creating a log file is as follows.
- Start MicroPeckerX Log Editor
- Change timestamp and CAN ID display formats
- Create a new log file (or load an existing log file)
- Add/change/delete log records
- Save the log file
1. Start MicroPeckerX Log Editor
MicroPeckerX Log Editor can be started from either the Start menu or MicroPeckerX Control Software.
Start from the Start menu
- Click the Windows logo on the taskbar or press the Windows key to open the Start menu.
- Click All.
- Expand the MicroPeckerX folder in the list.
- Click MicroPeckerX Log Editor.
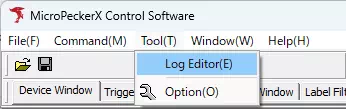
Start from MicroPeckerX Control Software
From the MicroPeckerX Control Software menu bar, select Tool - Log Editor.
2. Change Timestamp and CAN ID Display Formats
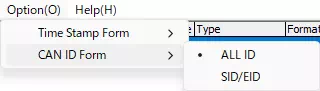
Timestamp and CAN ID display formats can be changed from Option in the menu bar.
Default timestamp/CAN ID formats differ depending on startup method.
- If started from the Start menu: timestamp is
+-HHH:MM:SS.mmm.uuu, CAN ID isALL ID. - If started from MicroPeckerX Control Software: both timestamp and CAN ID follow MicroPeckerX Control Software option settings.
Change timestamp display format
From Option - Time Stamp Form in the menu bar, select the timestamp display format from the submenu.

Change CAN ID display format
From Option - CAN ID Form in the menu bar, select the CAN ID display format from the submenu.
| Display Format | Description |
|---|---|
| ALL ID | Displays Base ID and ID Extension as a continuous 29-bit value (upper 11 bits: Base ID, lower 18 bits: ID Extension). |
| SID/EID | Displays Base ID and ID Extension separately. |
3. Create a New Log File (or Load an Existing One)
Create a new log file
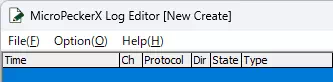
Select File - Create New Log from the menu bar.
This shows New Create in the title bar, and the log display area becomes empty.
Load an existing log file
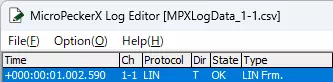
- Select File - Load Log from the menu bar.
- Select the log file to load in the file dialog.
If loading succeeds, the loaded file name appears in the title bar and the loaded contents appear in the log display area.
4. Add/Change/Delete Log Records
For log records with protocol DIO or A/D, only deletion is possible (add/change is not available).
Add one log record
- Click the Edit tab.
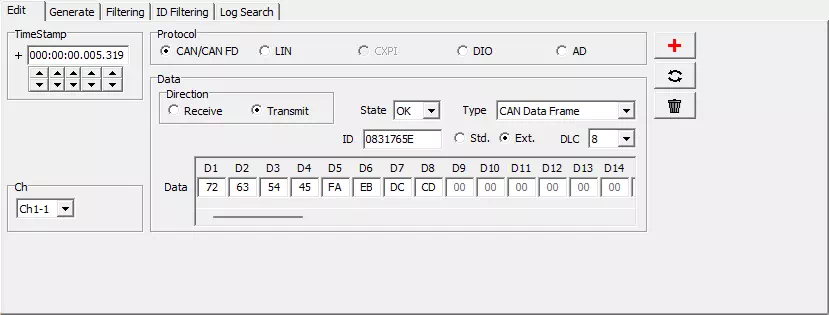
- Set each item in the Edit tab (timestamp, protocol, data, etc.) as needed.
For details, see here. - Click the
 button in the Edit tab. A log record is added based on the Edit tab settings.
 - To add more records, repeat steps 2 and 3.
If a log record with the same timestamp and Ch already exists in the log display area when step 3 is executed, the error dialog The log of the same time and Ch cannot be added. appears and the record cannot be added.
Add multiple log records in batch
- Click the Generate tab.
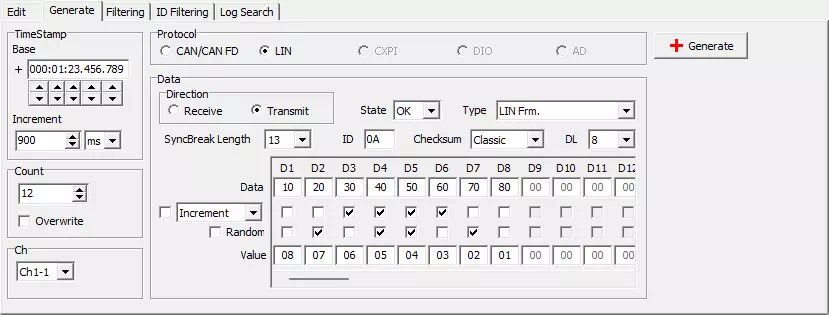
- Set each item in the Generate tab (timestamp, count, protocol, data, etc.) as needed.
For details, see here. - Click the
 button. Log records are added based on the Generate tab settings.
 - To add more records, repeat steps 2 and 3.
If a log record with the same timestamp and Ch already exists when step 3 is executed, the error dialog The log of the same time and Ch cannot be added. appears and no record is added.
Change one log record
- Click the Edit tab.
- Select the target log record in the log display area. The Edit tab settings switch to match that record.
- Set each item in the Edit tab (timestamp, protocol, data, etc.) as needed.
For details, see here. - Click the
 button. The selected record is changed according to Edit tab settings.
 - If there are more records to change, repeat steps 2 to 4.
If a log record with the same timestamp and Ch already exists when step 4 is executed, the error dialog The log of the same time and Ch cannot be added. appears and the record cannot be changed.
Delete one log record
- Click the Edit tab.
- Select the target log record in the log display area. The Edit tab settings switch to match that record.
- Click the
 button. The selected record is deleted.
 - If there are more records to delete, repeat steps 2 and 3.
Delete log records in a specific range
Right-click the log display area to show the following menu. You can delete log records in specific ranges in batch.
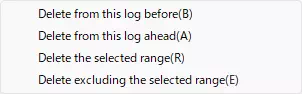
| Menu | Description |
|---|---|
| Delete from this log before | Deletes all log records above the selected log record. |
| Delete from this log ahead | Deletes all log records below the selected log record. |
| Delete the selected range | Deletes all log records in the selected range. |
| Delete excluding the selected range | Deletes all log records except for the selected range. |
To select a range of multiple log records, select the starting log record, then hold the Shift key and select the ending log record.
5. Save the Log File
Save as a new log file
- Select File - Save Log As... from the menu bar.
- In the file dialog, specify the destination folder and file name.
If an existing file name is selected in step 2, a confirmation dialog appears asking whether to overwrite.
If saving succeeds, the saved file name is shown in the title bar.
Overwrite an existing log file
Select File - Save Log from the menu bar.
If New Create is shown in the title bar, behavior is the same as "Save as a new log file".