License Registration Procedure
This section explains the full flow from launching Sunny License Manager to registering a license.
For license file issuance steps, refer to each MicroPeckerX product manual.
License Registration Steps
STEP 1: Connect MicroPeckerX to PC and Start Sunny License Manager
- Connect the MicroPeckerX device to the PC with a USB cable.
Use the included USB cable or equivalent to connect it to a USB port on the PC.
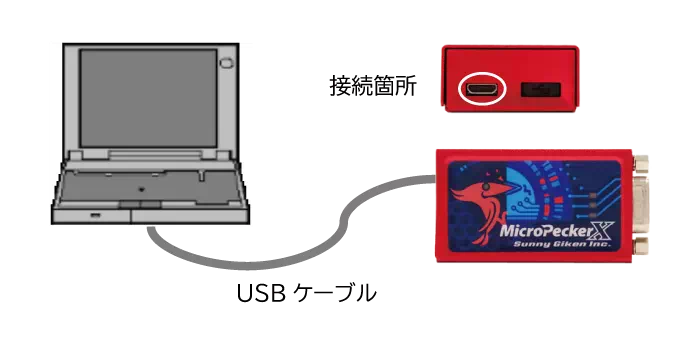
Note: Only the left USB port can be used. Do not remove the cap on the right side.
-
Click the Start button on the Windows taskbar to open the Start menu.
Click All to show the list of installed applications. -
Find Sunny License Manager in the list, or search by app name.
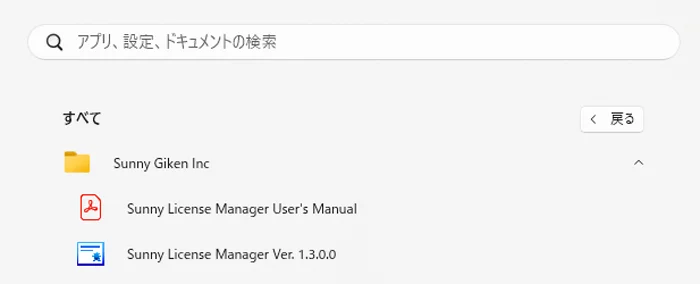
- Click Sunny License Manager to launch it.

STEP 2: Write the License File
- Click Write License in Sunny License Manager, or drag and drop a license file (
.snylic) into the window.
The Write License dialog appears.
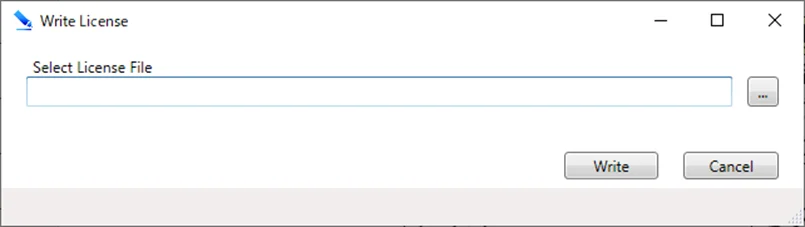
-
If you used drag-and-drop, the full path and file name appear in Select License File.
You can also click the file select button and choose the license file. -
Click Write to register the license file to the MicroPeckerX device.
-
When registration completes, the Write License dialog closes and the new license appears in the license list.
STEP 3: Verify Licenses
Click Connection in Sunny License Manager to detect all MicroPeckerX devices connected to the PC.
If devices are already detected, they are detected again.
Detected devices appear in License Holder, and the license information list for the selected device is shown.
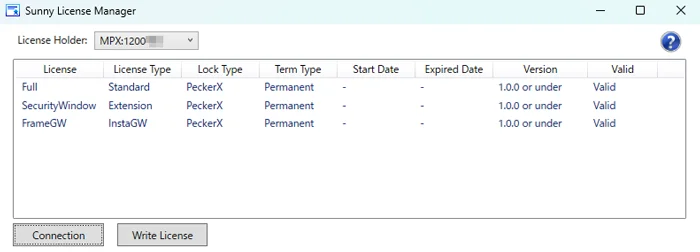
If Full is displayed in the license information list, registration is complete.
Sunny License Manager Screen Description

| No. | Item | Description |
|---|---|---|
| [1] | License Holder | Detected devices are displayed in a pull-down menu. You can select which device's license list to display. |
| [2] | License List | Displays the list of licenses registered on the device selected in License Holder. |
| License | Displays the license name. | |
| License Type | Displays license type: Standard or Extension. | |
| Lock Type | Displays the target device format, such as PeckerX. | |
| Term Type | Displays license period type: Term or Permanent. | |
| Start Date | If Term Type is Term, displays the start date.If Permanent, displays -. | |
| Expired Date | If Term Type is Term, displays the end date.If Permanent, displays -. | |
| Version | Displays applicable product versions (example: 1.0.0 or under). (*1) | |
| Valid | Displays license state (example: Valid). (*2) | |
| - |  button button | Click to open the user manual. |
| - | Connecion button | Click to detect all target devices connected to the PC. If detection has already been performed, devices are detected again. |
| - | Write License button | Click to open the license file registration dialog. The same dialog also opens by drag-and-drop of a .snylic file. |
*1: Meanings of version display values ([L]: lower bound, [U]: upper bound):
| Display | Description |
|---|---|
[L] - [U] | Applicable to versions from [L] to [U]. |
[L] or over | Applicable to versions [L] and above. |
[U] or under | Applicable to versions [U] and below. |
| (blank) | Applicable to all versions. |
*2: Meanings of license state values:
| Display | Description |
|---|---|
Valid | License is valid. |
Valid([n]days) | License is valid, but remaining period is 7 days or less ([n] is days remaining).In this state, the row background is red. |
Expired | License is invalid (period expired). In this state, the row background is black. |
Before | License is invalid (before start date). |
Write License Dialog Description
In the Write License dialog, you can register licenses from license files.
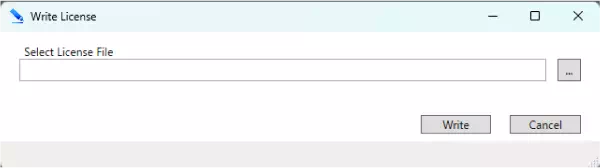
| Item | Description |
|---|---|
| Select License File | Displays the full path of the license file selected in the file dialog. (*1)(*2) |
 button button | Click to open the file dialog and select a license file. |
| Write button | Click to register the license file shown in Select License File. (*3)(*4) |
| Cancel button | Click to close the dialog without registering a license. |
*1: You can also enter the file path manually or drag and drop a license file onto this dialog.
*2: Depending on folder depth or path length, parts of the path may be shown as .... Focus the path display area to see the full path.
*3: When registration completes, the dialog closes. The registered device and its license information are selected.
*4: If expired licenses exist, the Delete Expired License dialog appears and you can delete those licenses.
Display and Deletion of Invalid Licenses
If expired (invalid) licenses already exist at registration time, the Delete Expired License dialog appears to confirm whether to delete them.
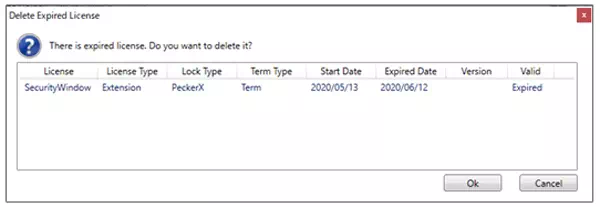
Click OK to delete all displayed licenses and close the dialog.
Exit Application
Click the X button at the top-right of the main window, or press [Alt] + [F4] to exit.