Setting Screen Overview
After installing this plugin, Security Window is added to MicroPeckerX Control Software.
From this window, you can configure message authentication, perform monitoring, and review logs.
Security Window is a dedicated setting/monitoring screen for the message authentication plugin.
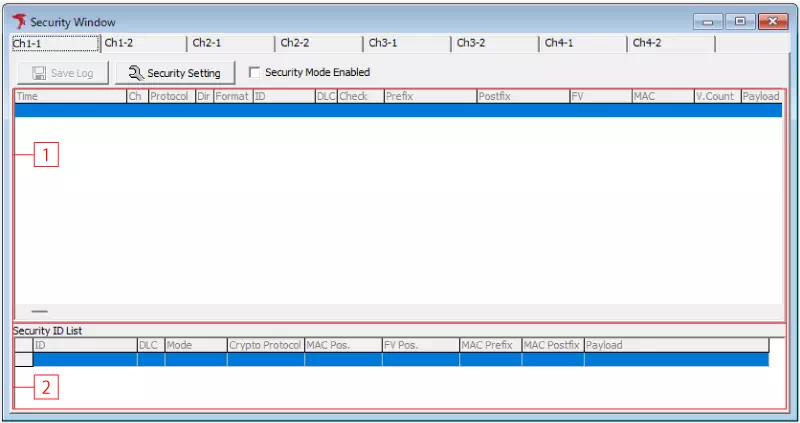
Security Window
Overview
- A tab is shown for each channel, allowing you to switch displayed settings and logs per channel.
- Includes security message log display, setting file save/load buttons, and a button to open detailed settings.
| No | Item | Description |
|---|---|---|
| [1] | Log area | Displays security message logs. |
| [2] | Security ID List | Displays target CAN IDs for message authentication and their security settings. |
| - |  button button | Opens a file dialog. Saves transmitted/received security messages shown on the selected channel tab as a CSV log file. |
| - |  button button | Opens the Security Setting dialog. |
| - | Security Mode Enabled | Enables/disables message authentication. When checked, message authentication is enabled. |
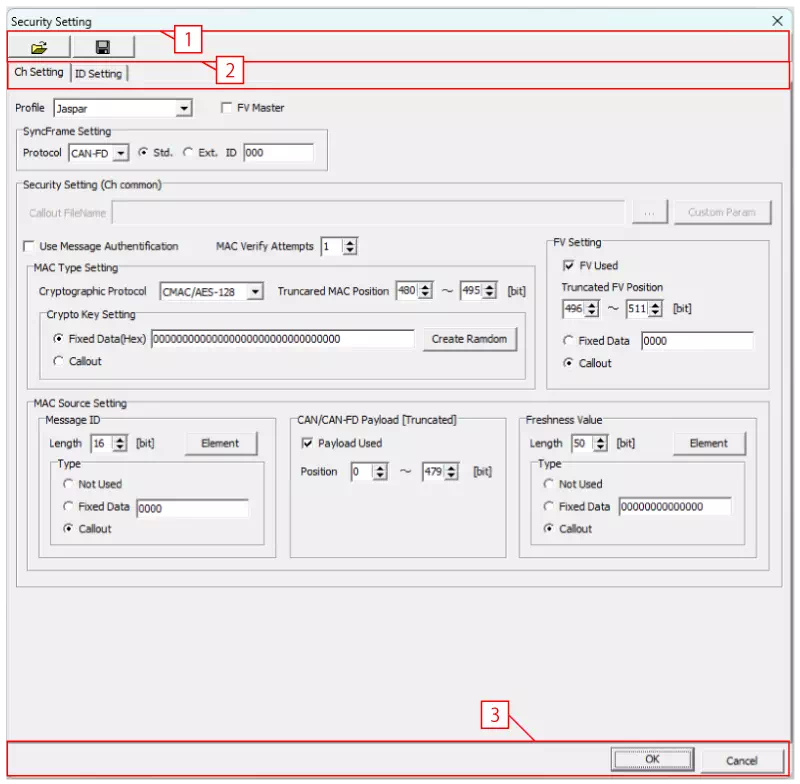
Security Setting Dialog
The Security Setting dialog is used for detailed message authentication configuration.
It has two tabs: Ch Setting (channel-common) and ID Setting (per CAN ID).
Typically, define overall policy in Ch Setting, then override only specific IDs in ID Setting.
In ID Setting, you can also configure periodic transmission with message authentication per CAN ID.
| No | Item | Description |
|---|---|---|
| [1] |  button button | Opens a file dialog. Loads the selected security setting file and applies its contents. |
 button button | Opens a file dialog. Saves current security settings to a security setting file. | |
| [2] | Ch Setting tab | Configures channel-common message authentication settings. |
| ID Setting tab | Configures message authentication settings per CAN ID. | |
| [3] |  button button | Saves security settings and closes the dialog. |
 button button | Discards changes and closes the dialog. |
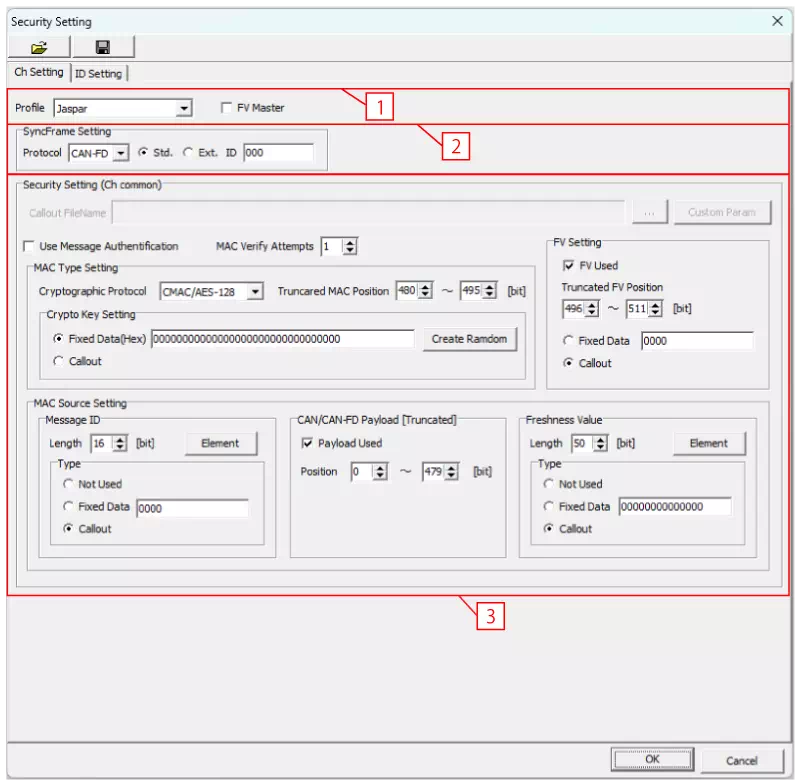
Ch Setting Tab (Common Settings)
In the Ch Setting tab, you can configure channel-common message authentication settings.
| No | Item | Description |
|---|---|---|
| [1] | Profile | Select the message authentication security profile:
|
| FV Master | Select master/slave for FV (Freshness Value). | |
| [2] | SyncFrame Setting | Configures synchronization messages. |
| [3] | Security Setting (Ch Common) | Configures channel-common message authentication settings. |
Choose profile according to your internal security policy and vehicle manufacturer requirements.
SyncFrame Setting
Configures synchronization message settings.

| Item | Description |
|---|---|
| Protocol | Select protocol: CAN or CAN-FD. |
| Std./Ext. | Select CAN ID type: Std. (standard ID) or Ext. (extended ID). |
| ID | Enter CAN ID. |
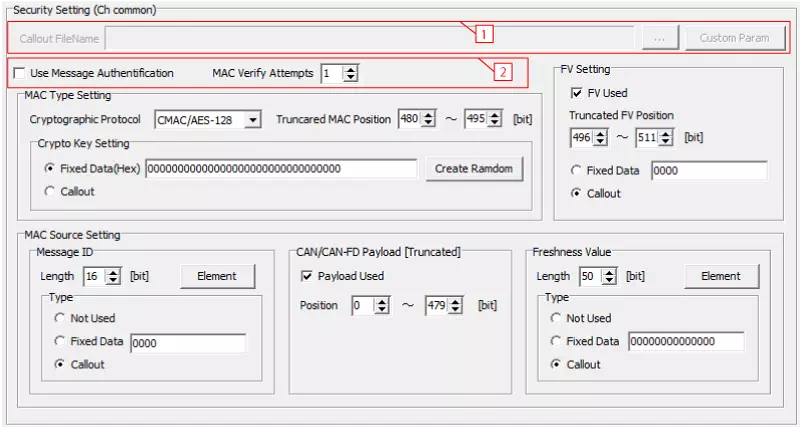
Security Setting (Ch common)
| No | Item | Description |
|---|---|---|
| [1] | Callout FileName | Behavior depends on selected profile:
|
 button button | Enabled when | |
 button button | Enabled when | |
| [2] | Use Message Authentification | Enables/disables message authentication. Checked means enabled. |
| MAC Verify Attempts | Enter maximum MAC verification attempts (1 to 255). If verification fails continuously up to this count, authentication error occurs. |
Use Callout DLL when extending authentication logic or key generation with an external program.
In Jaspar profile, fixed DLL is used automatically. DLL selection is available only in Custom profile.
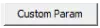
Callout Custom Param Setting
When Profile: Custom is selected, loading a callout DLL and clicking Custom Param opens this dialog.
It displays the list of custom parameters provided by the callout DLL.
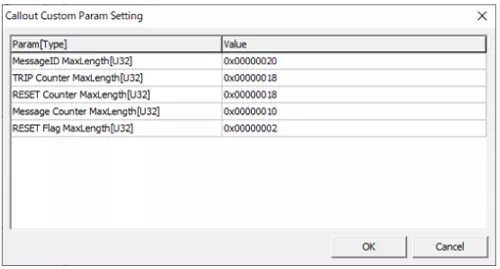
| Item | Description |
|---|---|
| Param[Type] | Displays parameter name and data type. Type notation: - Sn: signed integer (n = bit length)- Un: unsigned integer (n = bit length)- ASCII(m): string (m = byte length) |
| Value | Displays parameter value (signed integer in decimal, unsigned integer in hexadecimal). Click cell to edit. |
| button | Saves parameter settings and closes dialog. |
| button | Discards parameter changes and closes dialog. |
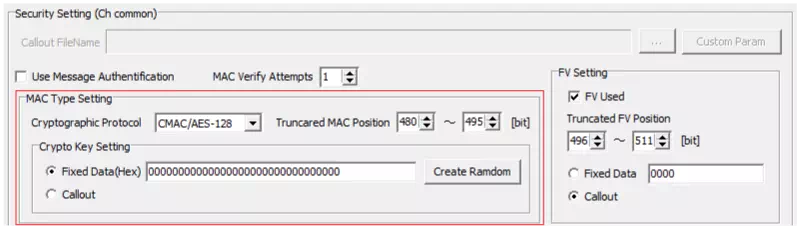
MAC Type Setting
Configures MAC type and key.
| Item | Description |
|---|---|
| Cryptographic Protocol | Select cryptographic protocol used for MAC generation. Only CMAC/AES-128 is available. |
| Truncated MAC Position | Specify bit position in Data field where truncated MAC is placed, using Motorola sequential. Example: if 40 to 63 is specified, upper 24 bits of MAC are placed in D6 to D8. |
| Crypto Key Setting | Select key generation method: - Fixed Data(Hex): uses fixed hexadecimal value entered right-aligned in big-endian. button generates a random fixed value. button generates a random fixed value.- Callout: uses value generated by callout DLL. |
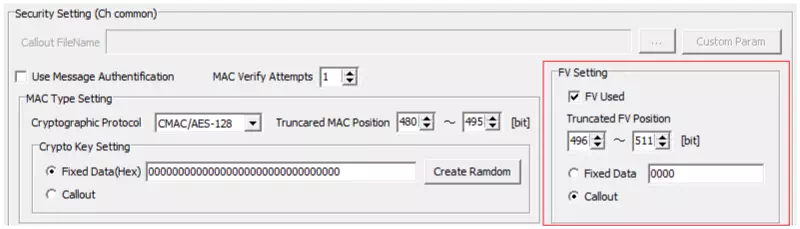
FV Setting
Configures FV.
| Item | Description |
|---|---|
| FV Used | Enables/disables FV. Checked means FV is used. |
| Truncated FV Posision | Specify FV bit length and FV bit position in Data field using Motorola sequential. Example: 32 to 39 means FV is 8 bits and placed in D5. |
| Fixed Data / Callout | Select FV generation method: - Fixed Data: uses fixed hexadecimal value entered right-aligned in big-endian.- Callout: uses value generated by callout DLL. |
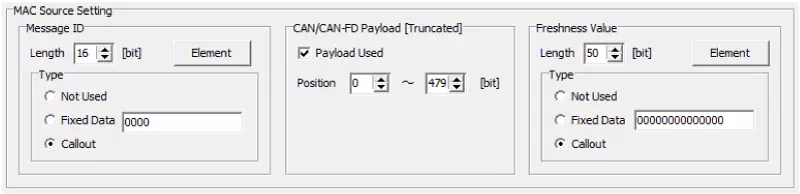
MAC Source Setting
Configures source data used for MAC calculation.
| Category | Item | Description |
|---|---|---|
| Message ID / Prefix | Configures prefix. Label changes by profile: - Jaspar: Message ID - Custom: Prefix | |
| Length | Specifies prefix bit length. | |
 button button | Opens Element Setting dialog to configure prefix elements. | |
| Type | Selects prefix generation method: - Not Used- Fixed Data: fixed hexadecimal value entered right-aligned in big-endian- Callout: value generated by callout DLL | |
| CAN/CAN-FD Payload [Truncated] | Configures payload. | |
| Payload Used | Enables/disables payload use. Checked means part of Data field can be used as payload. | |
| Position | Specifies bit position in Data field to use as payload using Motorola sequential. Example: 0 to 31 means D1 to D4 are treated as payload. | |
| Freshness Value / Postfix | Configures postfix. Label changes by profile: - Jaspar: Freshness Value - Custom: Postfix | |
| Length | Specifies postfix bit length. | |
| button | Opens Element Setting dialog to configure postfix elements. | |
| Type | Selects postfix generation method: - Not Used- Fixed Data: fixed hexadecimal value entered right-aligned in big-endian- Callout: value generated by callout DLL | |
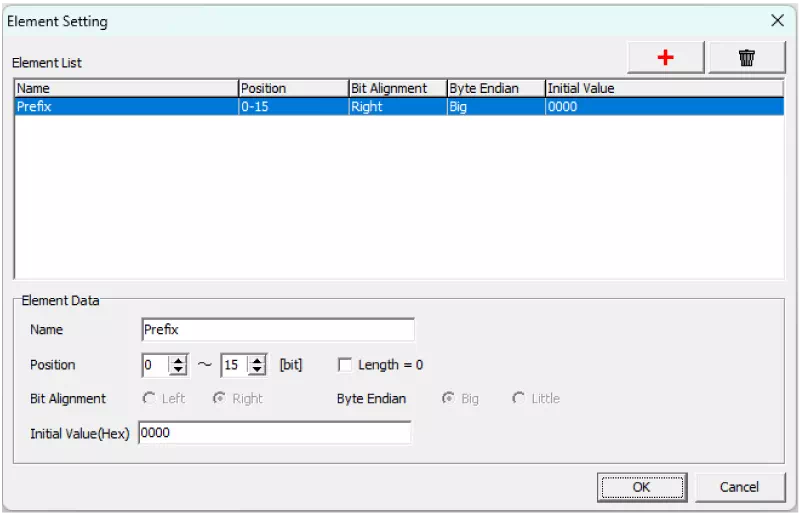
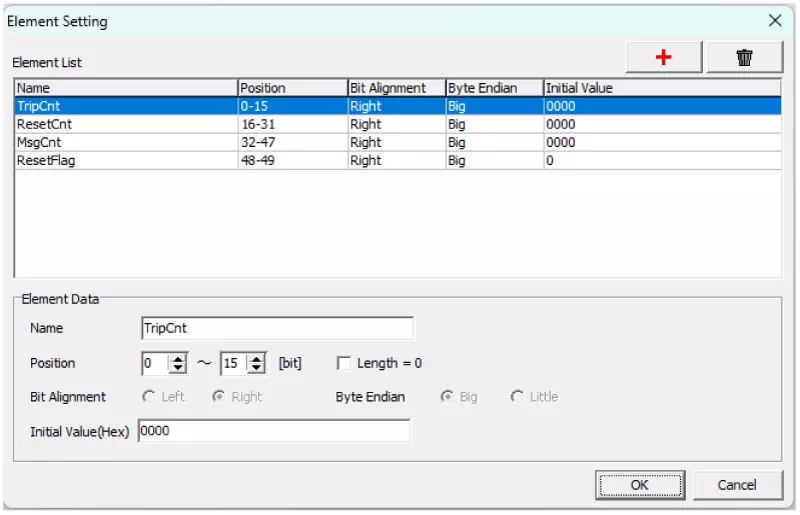
Element Setting
Click the Element button for Prefix/Postfix in MAC Source Setting to open this dialog.
Prefix
Postfix
| Category | Item | Description |
|---|---|---|
| Element List | Displays list of elements. | |
| Name | Displays element name. | |
| Position | Displays element bit position. | |
| Bit Alignment | Displays bit alignment. Left = left-aligned, Right = right-aligned. | |
| Byte Endian | Displays byte endian. Big = big-endian, Little = little-endian. | |
| Format | Displays element initial value (hex). | |
| Element Data | Allows editing selected element settings from Element List. | |
| Name | Enter element name. | |
| Position | Specify element bit length and bit position. | |
| Length = 0 | Check to set bit length to 0. When checked, all items except Name become - and are not editable. | |
| Initial Value(Hex) | Enter initial element value in hexadecimal. | |
 button button | Adds an element. | |
 button button | Deletes selected element from Element List. | |
| button | Saves element settings and closes dialog. (*3) | |
| button | Discards added/modified/deleted element settings and closes dialog. | |
If number of elements is 0, one element is auto-generated under these rules:
Name:Prefixfor prefix,Postfixfor postfix.Position: full range of prefix/postfix. Example: ifLengthis 16 bits, position is0 to 15.Initial Value(Hex): all bits are 0.
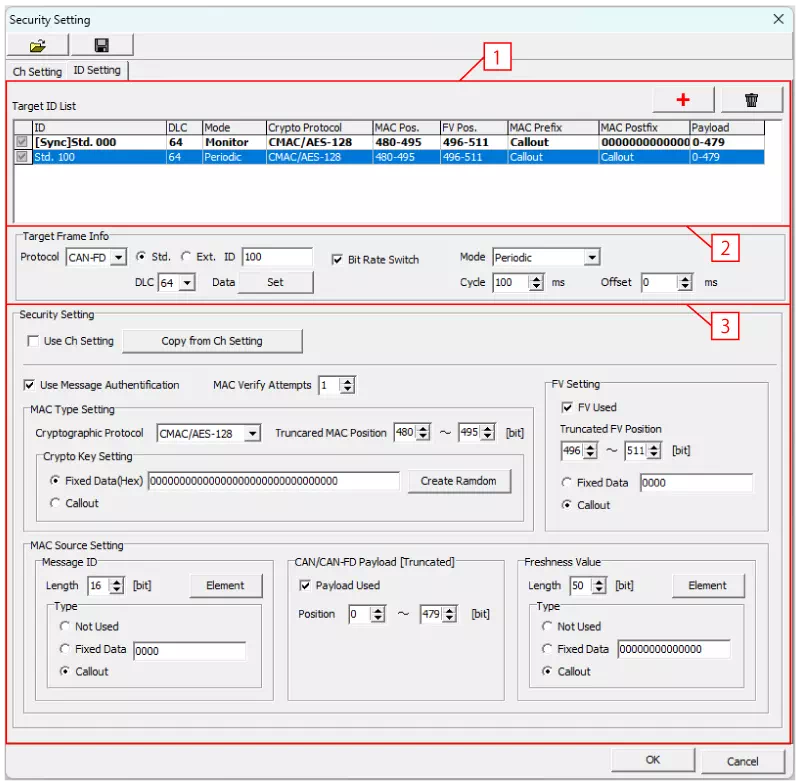
ID Setting Tab
In the ID Setting tab, you can configure message authentication per CAN ID.
| No | Item | Description |
|---|---|---|
| [1] | Target ID List | Displays list of message authentication settings per CAN ID. |
| button | Adds message authentication setting for CAN ID. | |
| button | Deletes selected CAN ID setting in Target ID List. | |
| [2] | Target Frame Info | Configures frame information for selected CAN ID in Target ID List. (*) |
| [3] | Security Setting | Changes message authentication settings for selected CAN ID in Target ID List. (*) |
*: Hidden when no CAN ID is registered in Target ID List.
Target ID List
Displays list of message authentication settings per CAN ID.

| Item | Description |
|---|---|
| ID | Displays CAN ID. Std. = standard ID, Ext. = extended ID. |
| DLC | Displays data length. |
| Mode (*1) | Displays transmission mode: - Monitor: monitor-only message- Periodic: periodic transmission message (transmits at cycle configured in Target Frame Info Cycle) |
| Crypto Protocol | Displays cryptographic protocol used for MAC generation. |
| MAC Pos. | Displays bit position in Data field where part of generated MAC is placed, using Motorola sequential. Example: 40-63 means upper 24 bits of MAC are placed at bits 40 to 63 (D6 to D8). |
| FV Pos. | Displays FV bit position in Data field using Motorola sequential. Example: 32-39 means FV is placed at bits 32 to 39 (D5).If FV is unused, NotUsed is displayed. |
| MAC Prefix | Displays prefix source data used for MAC. (*2) |
| MAC Postfix | Displays postfix source data used for MAC. (*2) |
| Payload | Displays payload bit position in Data field used as source data for MAC, using Motorola sequential. Example: 0-31 means bits 0 to 31 (D1 to D4) are used as payload. |
1: Monitor mode is receive-only. Periodic mode transmits at fixed cycle.
2: Displays Callout when callout DLL generated value is used, otherwise NotUsed.
Target Frame Info
Configures frame information for selected CAN ID in Target ID List.

| Item | Description |
|---|---|
| Protocol | Select protocol: CAN or CAN-FD. |
| Std./Ext. | Select CAN ID type: Std. (standard ID) or Ext. (extended ID). |
| ID | Enter CAN ID. |
| Bit Rate Switch | Enable/disable bit rate switch. Checked means enabled. |
| Mode | Select data frame transmission mode: - Monitor: monitor-only message- Periodic: periodic transmission message (sends at cycle configured in Cycle) |
| DLC | Select data frame length. |
| Data | Click  to open to open Data Setting dialog and configure Data field. |
| Cycle | Set transmission cycle (ms). |
| Offset | Set offset time (ms) from monitoring start to first data frame transmission. |
- Maximum number of CAN IDs for periodic transmission
For periodic messages (Mode: Periodic), up to 10 CAN IDs per channel and up to 64 CAN IDs total across all channels. - Minimum transmission cycle for periodic messages
Minimum cycle is(n x 1 ms), wherenis total number of authenticated CAN IDs configured on Ch1 and Ch2 of one MicroPeckerX unit.
Example: Ch1 has 2 IDs and Ch2 has 3 IDs -> minimum cycle is 5 ms.
Even if a shorter cycle is set inCycle, actual transmission cycle is adjusted to this minimum or longer.
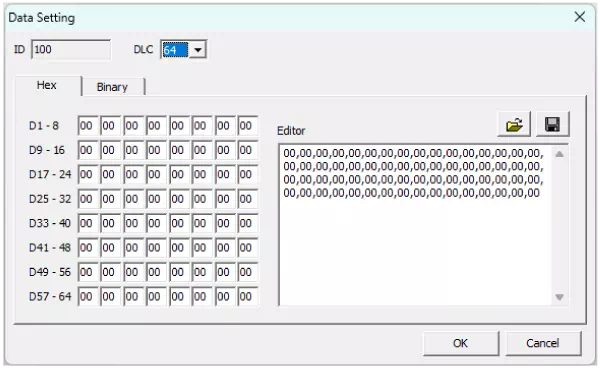
Data Setting Dialog
Click in Target ID List to open Data Setting dialog.
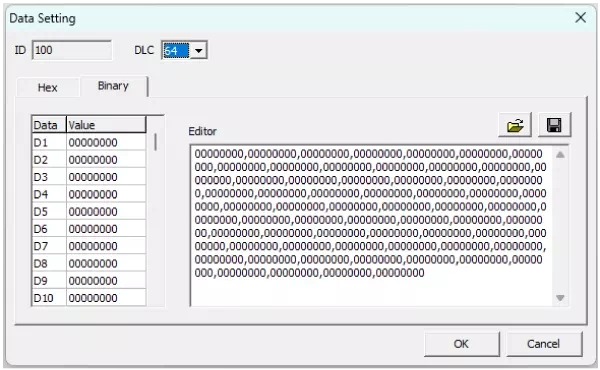
It has Hex and Binary tabs and allows switching display format for Data field editing.
Hex tab
Binary tab
| Category | Item | Description |
|---|---|---|
| ID | Displays CAN ID. | |
| DLC | Selects data length. | |
| Hex tab | Data area | Displays Data area in hexadecimal per byte. Example: D1 - 8 means D1, D2, ..., D8 from left to right. Editable. |
| Editor | Displays Data area in hexadecimal, comma-separated by byte. Editable. | |
| Binary tab | Data area | Displays Data area in binary per byte. Items shown: - Data: byte position in Data area.- Value: binary value; click cell to edit. |
| Editor | Displays Data area in binary, comma-separated by byte. Editable. | |
| button | Opens file dialog. Loads selected file and reflects file content to Data area. | |
| button | Opens file dialog. Saves Data area to file in CSV format. | |
| button | Saves Data area settings and closes dialog. | |
| button | Discards Data area changes and closes dialog. | |
Data area and Editor are linked: changing one reflects in the other.
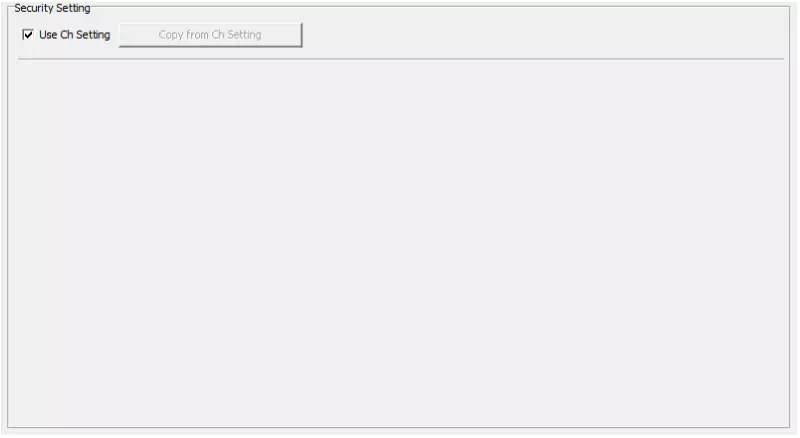
Security Setting
Lets you change message authentication settings for selected CAN ID in Target ID List.
By default, channel-common settings from Ch Setting are used, but per-ID settings are also supported.
Use Ch Setting: Checked
Uses channel-common message authentication settings from Ch Setting tab.
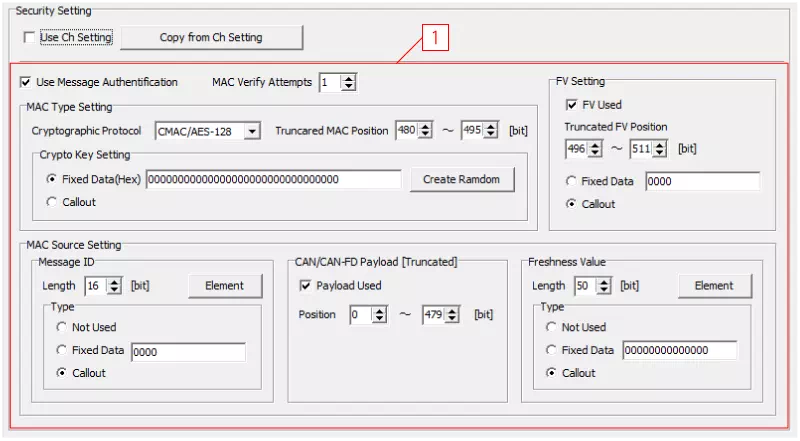
Use Ch Setting: Unchecked
Uses per-CAN-ID message authentication settings.
| Item | Description |
|---|---|
| Use Ch Setting | Select whether to use channel-common message authentication settings defined in Ch Setting tab.Checked means channel-common settings are used. |
 button button | Overwrites message authentication settings with channel-common settings. (*) Unavailable when Use Ch Setting is checked. |
| [1] | Configure per-CAN-ID message authentication settings. (*) For details, refer to Security Setting (Ch common). |
*: Callout DLL always uses channel-common message authentication settings.