How to Use
This section explains the full flow from launching MicroPeckerX Plugin Manager to adding plugins.
Basic Operations
1. Start the Application
Start the GUI application with the following steps.
- Open the Windows Start menu.
- Select "All apps" -> expand the "MicroPeckerX" folder.
- Click "MicroPeckerX Plugin Manager".
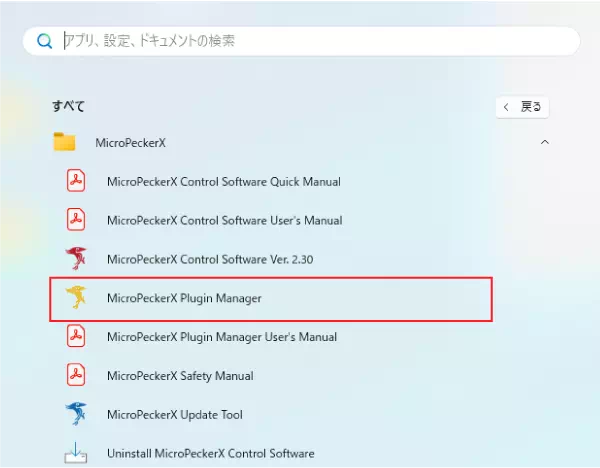
- MicroPeckerX Plugin Manager starts.
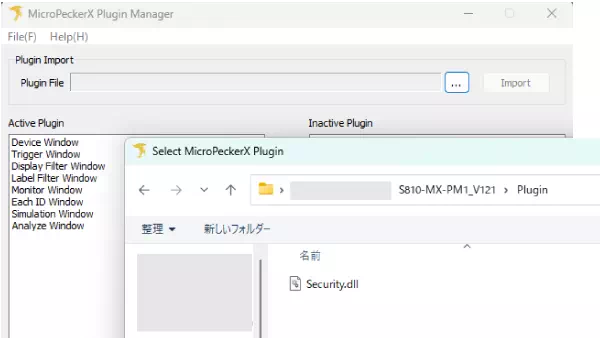
2. Add a Plugin
- Click the file selection button in "Plugin Import".
- Select a MicroPeckerX plugin file (DLL extension).
In this example, a message authentication plugin is added.
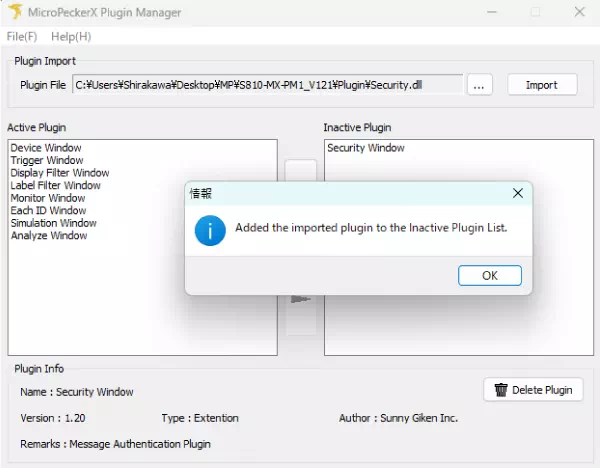
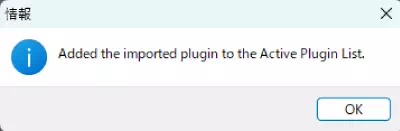
- Click "Import" to add it to the Inactive Plugin list.
Check the dialog content, then click "OK" to close the dialog.
3. Enable a Plugin
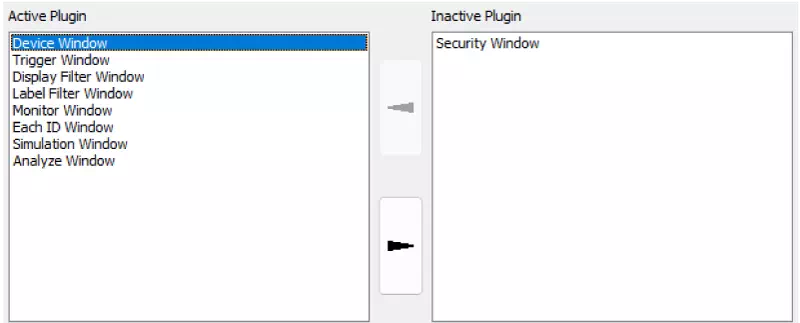
Windows listed in Active Plugin are enabled in MicroPeckerX Control Software.
Select the added plugin and click  to move it from Inactive Plugin to Active Plugin.
If the plugin is shown in the Active Plugin list, the plugin function is enabled.
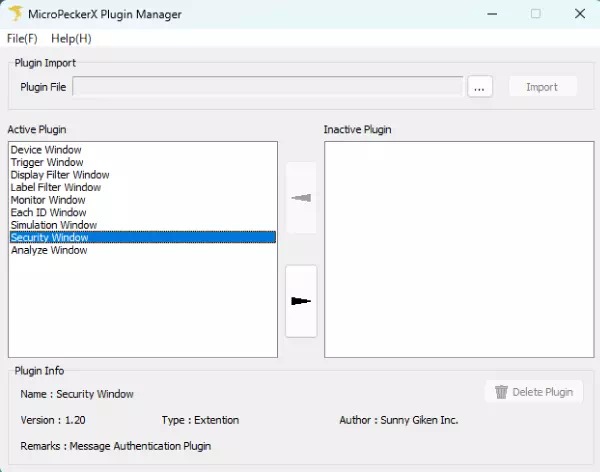
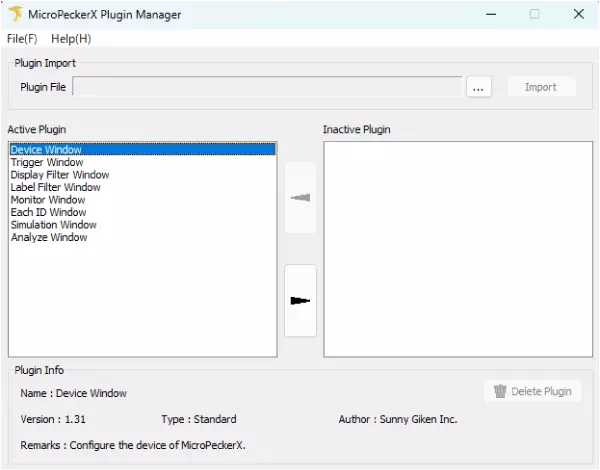
MicroPeckerX Plugin Manager Screen Description
This section explains display items and operations in MicroPeckerX Plugin Manager.
| No. | Item | Description |
|---|---|---|
| [1] | Menu Bar | Lets you exit the application and check version information. |
| [2] | Plugin Import | Used to load plugin files. |
| [3] | Active Plugin / Inactive Plugin | Lets you set plugin windows shown in MicroPeckerX Control Software to enabled/disabled. |
| [4] | Plugin Info | Displays detailed information for each plugin. |
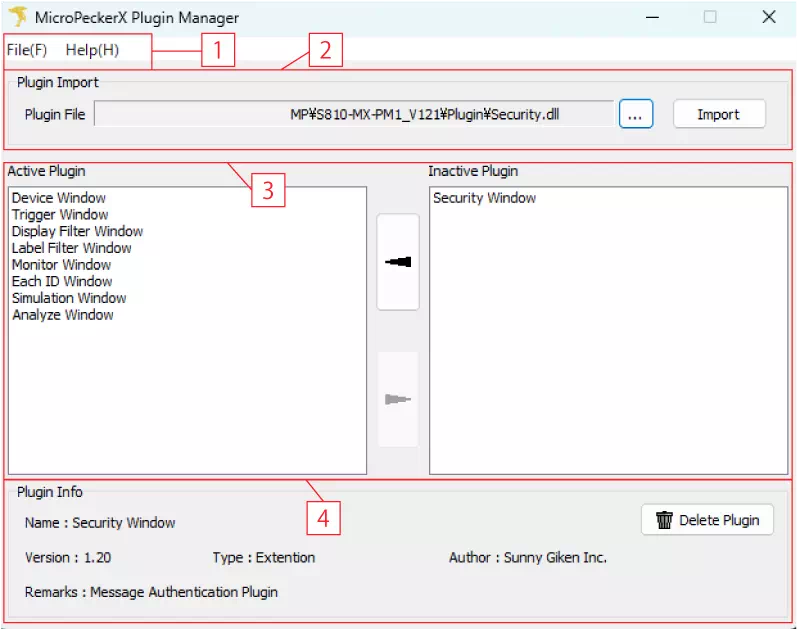
Menu Bar
| Global Menu | Sub Menu | Description |
|---|---|---|
| File | Exit | Exits MicroPeckerX Plugin Manager. Same operation as [Alt]+[F4]. |
| Help | Help | Opens the user manual. Same operation as [F1]. |
| About | Opens the version information dialog. |
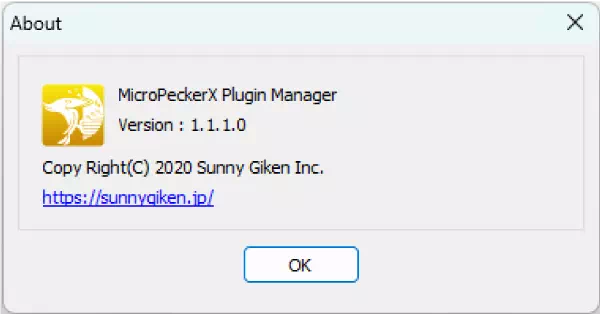
Version Information Dialog
Click Help -> About in the menu bar to open the version information dialog.
It displays the version information of MicroPeckerX Plugin Manager.
Plugin Import
You can select, add, or overwrite plugin files.

| Item | Description |
|---|---|
| Plugin File | Displays the file path of the plugin selected in the file dialog. (*1) |
 button button | Click to open the file dialog and select a plugin file to add. (*2) |
| Import button | Adds the plugin file shown in Plugin File. Clicking it displays the plugin in Inactive Plugin (inactive state). |
*1: You can also add by dragging and dropping a plugin file onto the file path display area.
*2: Selectable file extensions are .dll and .zip.
Plugin Import Dialogs
The following dialogs are displayed during Plugin Import.
- If a plugin with the same name already exists
An overwrite confirmation dialog is displayed.
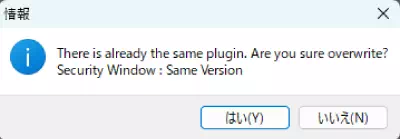
Click Yes to overwrite the plugin, or No not to overwrite.
- If a plugin with the same name exists and the version is different
A dialog showing version information and overwrite confirmation is displayed.
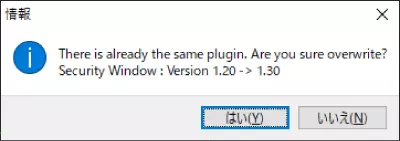
Click Yes to overwrite the plugin, or No not to overwrite.
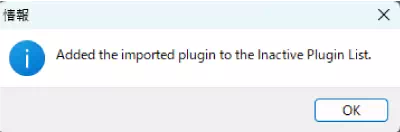
- If a plugin is added, or an inactive plugin is overwritten
The following dialog is displayed.
- If an active plugin is overwritten
The following dialog is displayed. In this case, the plugin does not become inactive.
Active Plugin / Inactive Plugin
You can view plugin lists and switch between active/inactive states.
| Item | Description |
|---|---|
| Active Plugin | Displays active plugins. These plugins are shown in MicroPeckerX Control Software and can be used. |
| Inactive Plugin | Displays inactive plugins. These plugins are not shown in MicroPeckerX Control Software. |
| button | Select a plugin in Inactive Plugin and click this button to move it to Active Plugin. A plugin moved to Active Plugin becomes active. |
 button button | Select a plugin in Active Plugin and click this button to move it to Inactive Plugin. A plugin moved to Inactive Plugin becomes inactive. |
Plugin Info
You can view detailed information for the plugin selected in Active Plugin or Inactive Plugin, and delete plugins.

| Item | Description |
|---|---|
| Name | Displays plugin name. |
| Version | Displays plugin version. |
| Type | Displays plugin type. - Standard: Standard plugin - Extension: Extension plugin |
| Author | Displays plugin author. |
| Remarks | Displays plugin description. |
| Delete Plugin button | Deletes the selected plugin. Deleted plugins become unavailable. (*) |
*: Only inactive plugins can be deleted. Standard plugins cannot be deleted.
Exit Application
Click the X button at the top-right of MicroPeckerX Plugin Manager, or press [Alt] + [F4] to exit.